From Trackpedia
If you know this track then please try to start this guide. Once, someone starts then other readers should refine it to make the descriptions better. But, someone has to be first. Just click the edit button on the top of the page or the right and go.
Track Map
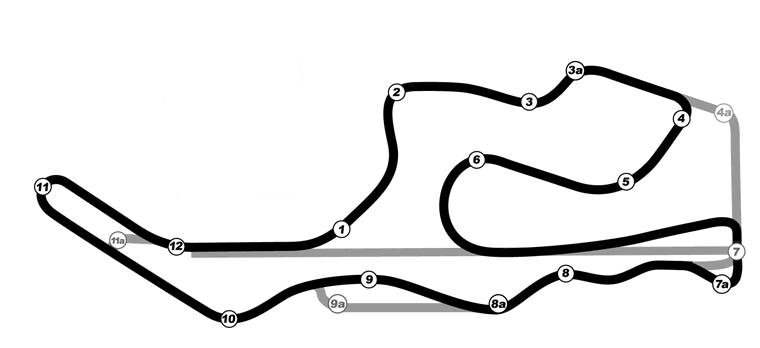
Turn 1
Generally flat out left turn that tightens, but will absorb surprising late power because of hill. Caution: May run wide with ripples. Despite improvements in runoff, you can still hit the outside bank.
Carry momentum up as close to Turn 2 as possible, but if you wait until late to brake, the bike will get light at the back end.
Make time to walk the track if at all possible. Elevation changes are spectacular, especially at the very end of Turn 1.
Turn 2
Gets light. Flat, but seems off camber. Followed by short straight downhill into 3, a left kink.
Turn 3
Hard power as suspension bottoms in the bumps. Off throttle only after apex. 3a seems offcamber like 2 because it crests after a climb, but a little faster.
Turn 4
Formerly comically offcamber, now smoother. Descending, though, so watch light rear end. Full power toward 5.
Turn 5
Careful of ripples, mind earth bank on left. Braking late will lift back of vehicle cresting into 6.
Turn 6
Long blind descending left: Enter too slow and you will be overrun.
Looking at traction patch limits attention to outside signal flags for downed riders ahead, around blind carousel, and turn station is not until end of turn on right. Running a little wide all the way through will allow limited advance view of traffic.
Little runoff: Don't count on anything to stop you but a steep hill if you go wide at entry or mid-turn.
Exit: Expect ripples and run wide. Jiggling camber transition: Diagonal, crossing onto the drag strip. Mind earth bank at far right.
Develop all the exit speed you can: Must carry plenty of momentum out of 6 to get well into top gear for long climb up straightaway to 7.
Turn 7
Technically a hairpin, but faster. Experiment with entry speed, as there is plenty of runoff and perfect visibility all the way around.
Keep in mind it is always up to the overtaking rider to make a clean pass. An faster rider perished after the 7a kink when a slower rider lurched over unexpectedly.
Turn 8
Medium fast, blind left. No runoff: Hard fence on outside.
Turn 8a
8a is a separate blind right turn. Do not run wide here, either: Fatality at vertical hill on left.
Turn 9
Medium fast blind left. Again, no runoff on right: Fence and width of track only. One fatality here was collision with running deer, another was a runover.
Turn 10
Fastest turn on the course, down on the tank. Runoff improved, but do not run wide here. Do NOT early apex.
== 10-11 Straightaway
Setup for entry into Turn 11. Mind traffic carefully: Pick targets and outbrake them, but if you miscalculate and blow your braking point or traction even slightly, you can get so out of shape you may lose a dozen places recovering. Worst case is sliding off into barrier, which can break something.
Turn 11
Hairpin with plenty of visibility all the way through. Expect roadblocks by inexplicably slower riders: Be patient. Even a little overcooking is not worth possible gain. Running slightly wide can increase turn circumference too much to overcome with extra speed. Although, yes, Paul Newman used to enjoy getting on slower guys' bumpers here, they can take you out, so get past them at the exit.
Turn 12
Medium fast blind left kink, at end of which is Start-Finish. Watch for pavement transitions that may make you run wide to hard barrier on right, scene of a fatality. Flat out all the way through Turn 1.