Turn by turn guide to the Calabogie Motorsports Park trackFrom Trackpedia
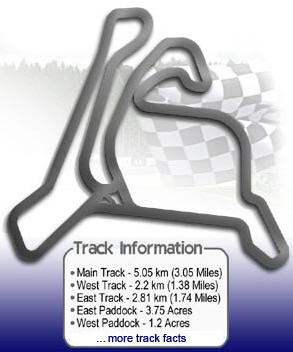
Track MapKinkJust past the Start/Finish line is a very fast left hander. Higher horsepower cars will have to stab (or brush) the brakes while others may get by with just a lift. The apex curbing starts late, but the start of the curbing may be brushed. After the Kink, there is plenty of time to drift back to the left to set up for Jacques. JacquesThe entrance to Jacques runs along the pit wall for the lower paddock. Brake hard heading down hill, turn right, taking a bit of curb, and head for the outside curbing. You will be set up for the entrance to Gilles. There is a marshal station at the turn-in point for Gilles. GillesGilles is a blind, uphill right hander that connects Jacques to Easy, and needs to be done right to get maximum speed going into the longest straight-away on the track. The entrance to Gilles is linked to Jacques by a steep up-hill incline. A slight lift is required just prior to turn-in. At turn-in, the apex is obscured by the hill as you start the turn. With a fast entrance, the car is pushed out to mid-track past the apex. Lower powered cars can hold the middle of the track for a second, then turn left into Easy. Higher powered cars will want to pull the car back to the right to smooth out Easy, and get to full throttle as soon as possible. EasyEasy is a slight kink to the left. After the apex, let the car drift all the way to the right - you've got a half km straightaway to position the car for the Big Rock complex. The straight-away is known as Rocky Road. This is one of 3 kinks at the start of a straight. Beginners may have a problem remembering what's coming up. Big RockThe straight ends in the "Big Rock" complex. It is important to maintain speed into the slow complex, so brake late, and dive bomb the first apex (Mulligans). One can get a bit of a swing from left to right as they fly past the apex. Though the car gets pushed out towards the exit curbing, you need to set up for the next apex prior to reaching the edge of the track. Accelerate along the short straight between Mulligans and Big Rock, then stab the brakes for the turn in to Big Rock. There is quite a bit of camber at Big Rock, so it is easy to hold the car to the apex curbing. Momentum will carry you out half way across the track as you drive up the hill to the blind Candy Mountain kink. Candy MountainThis is the second of three kinks that start a straight-away, and the first of two with blind crests. There is a feeling of exhilaration as one crests the hill, sees that they are at the apex on the left, have plenty of corner-exit room on the right, and have a 400m straight to accellerate down. Leaving the Big Rock apex, climbing the hill approaching Candy Mountain, the car is about mid-track. Look for the two tall pine trees over the crest of the hill you are climbing. As the turn is blind, these are your only landmarks. Aim initially for the tallest pine tree on the right. Once the car has settled, start the turn in for Candy Mountain by aiming for the smaller pine tree on the left. You will be able to run full throttle from the exit of Big Rock through Candy Mountain, all the way to toughest turn on the track. Temptationhttp://www.calabogiemotorsports.com/photo96373206.htm This is the most difficult turn on the track. It is a severe decreasing radius corner with some camber on the inside of a crown through the middle of the road, and off camber on the outside of the crown. Cars running on the outside of the crown will push out from the corner, but cars inside the crown will have good grip. In a DE event, most students will treat this as a 3 part turn. Brake and downshift in a straight line at the end of the straightaway. Turn towards the middle rear of the asphalt on the outside of the turn. Brake in a straight line, and turn towards the apex. Drive towards the apex, and brake a third time prior to turning in for the apex. There is a large pine tree visible from the second brake point that marks the exit point of the turn. Students can use that as a good landmark, as it is impossible to see through the turn until at the apex. There is currently no exit curbing on this turn - likely until the line is confirmed at some upcoming race weekends. More experienced drivers will be tempted to trail brake into the turn to get the car to rotate through the ever-tightening corner. From the straight, one can drive into the turn, aiming well to the left. As the turn tightens up, drag the brakes to get the car to rotate. Be very aware of the crown in the road, and the off camber portion awaiting a drifting driver who goes in too deep. A rotating car will quickly become a spinning car. After the initial trail brake, the car is actually driven mid track to the turn in point for the apex. Thus racers and more experienced drivers will want to cut the corner and run tighter to the inside. Less experienced student drivers will stay more to the outside. Telemetry has shown that different lines through this corner can affect lap times by up to 2 seconds. The turn exits on to another kink at the crest of a hill, then on to another straight. DeliveranceThe run out of temptation appears similar to Rocky Road. Cars with good grip can go full throttle up the hill to the blind apex crest of a turn just prior to a straight. After Deliverance, cars will naturally push left as they settle, then accellerate down hill to a fast right hander into the Beak complex. Note that while the Rocky Road straight ended with a run at the inside of its turn complex, you need to finish this straight on the left. The BeakThis complex is a series of 4 turns. Aim to the left as you brake at the end of the straight after Deliverance. Look up the track as you turn in, and let the car out to the left side of the track. Smoothly get on the throttle, and accelerate down hill then up hill towards the entrance to the Beak. Aim to the left side of the track, and brake. Turn hard to the right. With good grip in the dry, it is possible to clip the Beak well in front of the apex curbing. There is so much grip through the Throat, given the natural slope of the track, that one can apex early, and still bring the car around for the apex at the Throat. If the track is wet and slippery, aim for the apex curbing, and hope that the car can get around the next 3 turns. There is a brief accelleration zone as you turn to the left, and drive past the Throat apex and up to the Hook left hander. Turn in early for the hook, and let the car push out to the right. The track seems to widen, and with it running up hill, the turn can be apexed early. Use all the track to the right, then let the car drift back to the left as you climb up the Ridge to the highest point on the track. The SpoonAfter exiting from the Beak complex on the right, bring the car to the left side of the track as you climb. Start your turn as you crest the hill. The car will get light, and the back end has a tendancy to get a bit loose. As a result, most people lift just prior to the turn-in. As you crest the Ridge (the highest part of the track), you will see the late apex below and to the right. Get back on the gas (if you've had to lift) and accelerate down the hill. Hitting the apex will bring you into position on the right side of the track for the turn in to 4 Left. 4 LeftThis very fast turn should can be entered with an early turn-in, making use of all the track at the exit. Note that there is no exit curbing, however a tire wall has been installed just in front of the large rock that sits in the middle of the Quary Complex. There is plenty of room to get the car back over to the left for the entrance to the Quary turns. In a race, this may be a prime passing spot, with the faster cars well set on the right to take the inside line at the entrance to the Quary. The QuarryThis is the part of the course thats going to make the track famous. The carosel is a double apex that is relatively flat. The outrun area is very short and terminated by very steep banks...I mean very steep. This will be the spot for photographers to get a commanding view of the track. The entrance should be taken smoothly, with the car moving towards the left side of the track when half-way around. With a lift (no brake), the car can be turned further to the right and aimed almost towards Pit-In. This trajectory should take the car to the far left side of the track, about 3/4 of the way around. The car will pass-by the inside curbing on the right, but need not touch it. There is no curbing at the outside of the track - however there is a small drop-off that will severely rattle any car that goes off track here. Hopefully the owners will correct this. From this left side of the track, turn the car into the sharp right hander (Wicked). Take this apex late, and hug the right side of the track to set the car up for the left hander - Wilson's - that puts you back on the front straight. The curbs for Wicked and Wilson's are steep and tall, and should be avoided. Any contact with them will upset the car, and could result in a poor entrance to the front straight. |

