From Trackpedia
If you know this track then please try to start this guide. Once, someone starts then other readers should refine it to make the descriptions better. But, someone has to be first. Just click the edit button on the top of the page or the right and go.
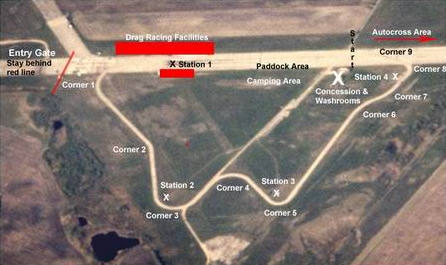
Track Map
Turn 1
Turn One is at the fastest point on the track. It is actually two turns joined by a very, very short straight. The main straight is located on the tarmac of the old airfield. On your line to the apex you cross over the edge of the tarmac. This causes a slight "bump" which causes most cars to jump sideways - so be careful! Shift down one gear before entering corner. Trail brake through the first part of the corner. The first part of the corner is a Type 2 corner but the second part becomes a Type 1 as you enter the next section of track.
Enter the first part of the corner closer to the center line and work down to the apex, crossing the bump on your line. The apex is late and quite long. On the exit you aim for the end of the concrete rumble strip.
Turn 2
This corner is a typical Type 3 corner - easy to mess up but also easy to get it right.
Straighten the corner as much as possible if racing by yourself. If racing close to another car you might want to go no further to DL (Driver's Left) than the center of the track on the exit.
If you are running street tires and you hear some tire noise you just lost .5 seconds on this lap!
Enter corner from DL, aim for a central apex if going to the L side of the track on the exit. If only going to the center of the track on the exit, use a slightly later apex.
Flat out through here!
Turn 3
This is a left turn of approximatelt 120 degrees. This corner is entered from DR under heavy braking. If your brakes fail you will go off the corner and end up against the berm. If this happens, there is sufficient space to slide the car sideways, but you have to be quick to adopt it.
Brake hard up to your entry. Watch out for passing under braking - good corner for it. You will see a patch on the surface, put your right wheels on this patch and follow it to the apex. You will have to shift to at least second for this corner and force yourself to up-shift before reaching the out side of the corner on the exit. Do not drop a wheel on the exit as you could loose the rear and spin.
Turn 4
This is another Type 3 corner. It is a right turn of 90 - 100 degrees. Cars can enter this corner from DL of the track or from the center of the track. Thee is a patch in this corner, put your Laft wheels on this patch. On the inside of the apex there are three speed bumps. The fast line has the front wheel which is unloaded at this time just tap the top of each bump.
Front wheel drive cars don't have to brake in this corner, just roll out of the throttle momentarily to get the weight transfer to the front wheels at the turn in point and get back on the throttle smoothly.
The shute between 3 and 4 is short but it is recommended to shift up at red-line instead of screaming through this corner. It won't affect your overall lap time, but will preserve the machinery. As you approach your exit you will be on DL - do not drop a wheel or you will spin out.
Turn 5
This corner is one of the more important on the track. It is a Type 1 Left turn of approximately 130 Degerees.
The distance from 4 to 5 is short so it is important that you get over to DR ASAP so that you can brake for the corner. Also this is another favorite passing corner.
There is another patch on the surface. Put your Rt wheels on the patch and follow it to the apex. On the inside of the corner are a series of 5 speed bumps. Aim for the last bump as your apex. Drift Rt to the edge of the track on the exit aiming for the end of the concrete repair on the outside
Turn 6
Turn 6 is a slight Rt turn, It is another Type 3 corner.
After you exit Turn 5 you work your way to DL, accelerating hard all the way. This is a place for faster cars to start a pass.
Straighten out the corner as much as possible. No brakes yet.
Turn 7
This is another Type 3 corner but a slight Lt turn. There are two lines through this corner. One has you go from curb DR to curb DL. The other has you go from curb DR to the center of the track in Turn 7. The reason for this line is that it brings you up to the side of the track DR and allows your car to stabilize more before turning into Turn 8. Faster cars will have to start braking in Turn 7 in order to slow sufficiently for Turn 8.
Turn 8
This is the most important ciorner on the track as it leads onto the longest straight.
Start with the car under braking at the edge of the track DR. There is a concrete patch on the inside of the track. You want your L front tire to touch this patch. On the exit we cross the drag strip and there is no clearly defined marker for most people on the exit. If you look closely you will see the remains of a ramp that was removed for the drag strip. It is hard to see, so on your first visit I would suggest that you go out and look for the mark.
There is another patch on the track surface. Put your Rt wheels on the patch. Touch the concrete patch DL at the apex and let the car drift Rt as you feed in throttle. Rear wheel cars will have to unwind the steering as they accelerate. This corner is the hardest to learn, but once learned can be quite enjoyable to execute.
If you mess up this corner there is an expanse of tarmac to allow you to get control of the car with out hitting anything. This corner favours Frt whl drive race cars and is another passing zone.
Turn 9
This is the last corner on the track. It is a slight L turn. As you exit Turn 8 you will carry your arc through Turn 9, unwinding the steering as your speed increases. Executed correctly the 6, 7, 8, 9 complex is alot of fun. From here you will accelerate hard down the track to turn 1.