From Trackpedia
If you know this track then please try to start this guide. Once, someone starts then other readers should refine it to make the descriptions better. But, someone has to be first. Just click the edit button on the top of the page or the right and go.
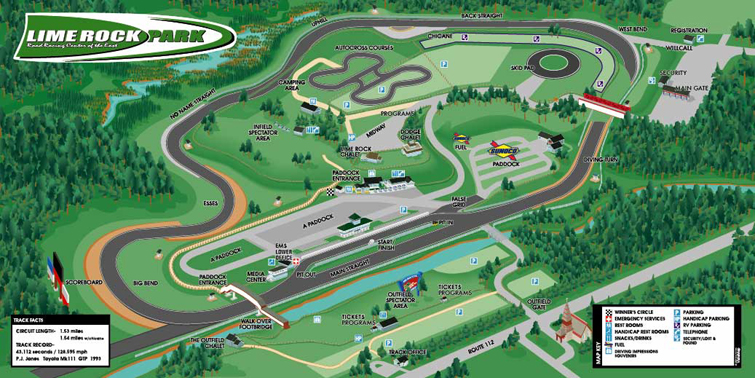
Track Map
Turn 1
Turn 1 is taught at the Skip Barber race school as an "Entry Speed Corner", the only one on the track, and thus, Skip Barber teaches to maximize entry speed into this corner. The method they teach for this corner is a very extended period of "Trail Braking". Assuming you have correctly exited the "Downhill" (turn #7), and tracked fully out to the left, you should be coming into the braking zone at 115mph to 140mph (depending on the horsepower / weight / skill / balls ) of your car (my 2007 GT3 can enter the braking Zone (marker 5 1/2 out of 6) comfortably at 130mph.
What happens after the initial braking point (lets say #6 for cars coming in hot) is that you now have a choice: you can do the typical very late turn-in ("well" after the #1 braking marker) or you can apply maximum braking between #6 until the midpoint between #2 and #1 and then release some brakes and very slowly begin to turn in (a reference marker here is that as you go under the bridge you should be "RIGHT" of the BWM logo on the bridge). Using this trail braking method (it really is a very long very slight turn of the wheel) you will early apex but you will be carrying a much higher entry speed (65mph to 75mph in my GT3) and you will actually then enter a period of using 100% of the tires for cornering with little to no acceleration for a small period of time after the early apex to the mid corner point very high on the track between turns #1 and #2. While this method is clearly the racing line (cut off the inside pass under braking) it is also the fastest line by a long shot in my opinion.
Turn 2
Turn #2, the second half of BigBen, has a late apex that sets up a very short straight of full but short acceleration before turn #3 (the Left Hander). In order to be able to go WOT you will have to use all the camber that you are given by hitting the apex exactly - if you miss it even by a little you will not get that last 1/2 second - so front right wheel must be put right next to the rumbles and the camber will hold you in as you go WOT for track out.
Apex early here and you can easily lose 1+ second.
You will know you have apexed properly when can control the track out line with your right foot - if your are saving the corner with your hands you apexed early.
Turn 3
Turn #3 (The Left Hander)
This is not the most critical corner on the track, but it is the hardest by far to get correctly. Why this is so is because unless you enter the corner with enough speed, you will most likely turn in far to early after you have "hit the brakes" to slow down on corner entry.
The Key to #3 (The Left Hander) is NOT to apply 100% brakes as you enter but to apply 50% and then trail the brakes as you "Slowly" turn in.
This corner also has camber helping you and it is slow so don't be afraid to use all the track to the right and get very high up into the track for a very late apex - it is the apex that is the key as it sets up the second most important corner on the track (#4 or No Name - the second longest straight and a higher speed corner if taken properly).
- remember, 50% initial brakes then slowly release to help rotate the car is the key and then make sure your left wheels are as far left as possible when the turn is completed
Turn 4
Turn #4 (entry onto No Name Straight)
- While turn #7 (the downhill) is the most important turn at Limerock, turn #4 is the second most import and easier to get wrong. The reason why is because of the camber in the corner - there is both positve (helping) and negative (not helping) and it is very easy to hit the negative part too early and kill your exit speed and thus your lap times.
- The big difference between novices and better drivers is that virtually every novice will brake or lift into the corner and every faster driver will be on the gas. The only way to be on the gas at turn in (if you are going fast enough) is hit the apex exactly. When you do, you get the full benefit of the camber and it will sling shot you around the corner and you can comfortably track out under throttle (i.e. turn with your right foot). If you miss the apex by more than 6 inches and you are on throttle and going fast, you will track out onto negative camber and it will shoot you left at which point you will adjust your throttle, turn your hands more to scrub speed and you will be slow.
- The hard acceleration out on to very slightly negative camber will eventually lead you mid track, as the straight bends left. There are rumble strips on the right as the track bends left (you should not hit these if you are going fast enough but should be a couple a yards left of them - remember, the slight negative camber is keeping your momentum left as you track out and even though the track fades left you should not be fully right (on the rumbles if you are at full throttle).
- a mental note to do this corner correctly that works for me is "Very Fast Turn in" - i.e do not miss the apex. Also, to do this properly, you MUST be fully left before turn in to get the angle correct.
Turn 5
Turn #5 (The Up Hill)
Limerock has 2 corners where you can do real damage to your car - the Up Hill is one, the Down Hill is the other. It is also one of those corners that you will never forget once you have driven the track as you don't often go straight up a small ski hill at full throttle.
To set up the corner, you are coming into the Up Hill at full throttle (115mph in 3rd/4th) and you have to brake pretty good on a bumpy track surface (pre-resurface). The safest way to take the Up Hill is to late apex and aim your front left tires just left of track center as you crest the hill. Slighty faster is mid apex with your right side wheels being midtrack as you crest the hill - this position feels good, safe and fast and you have huge grip from the hill's compression - you will trackout with a few feet to spare. The fastest line is a mid / mid/early apex with early braking completed to set up a near WOT uphill attack with additional compression / grip from the hill - this line may also require an additional steering input after the apex to straighten the car out before you crest the hill as the earlier apex and additional speed push you further left - there is less room for error here as once you crest the hill you will be fully track left.
NOTE
- There is really only one rule that you must follow on this turn, when you 'crest the hill', you 'MUST HAVE THE WHEEL STRAIGHT'. As you pick up speed, you will have enough speed to unload the rear springs (front also if you are extremely fast) and 'get air' for at least a fraction of a second. If and when you do this, and the wheel is not 'STRAIGHT', you will likely crash as you will land not straight and the car will likely snap in one direction or the other depending on the car's rotation and steering angle - most likely the front will hook and you will go straight right into a wall.
If the only thing you say to yourself on this track is 'STRAIGHT WHEEL OVER THE HILL' you will be fine.
Strategy on this turn is then to late apex and leave yourself lots of room / time on trackout to have your hands straight and then to slowly earlier and earlier apex until you have still given yourself at least a foot or so when you land on the left to save your bacon. It you don't care about your car and are pushing for that last 1/10th you will have to be fully left when you land with absolutely straight hands.
Turn 6
Turn #6 (West Bend)
This is a fast righthand sweeper that can be taken faster than you think. If you haven't used every last inch of the rumbles on exit you need to go faster. But just remember, this corner is not worth dying for and you are just about to hit the most important corner on the track so complete West Bend as fast as you can but then get ready for the braking zone after trackout as it is critical to have the best braking zone / turn in/ track out that suits you/your car/ track conditions coming into Turn #7 (the downhill)
Turn 7
Turn #7 (The Down Hill)
This is a very fast, downhill, compression for additional grip right hander.
As you are about to enter a very long straight, in combination to the coner being a fast corner, this is it - this is where you will lose the most time by not doing the corner well.
My advise is the crest the hill at full throttle and the second the nose sets on the downhill get on the brakes early but not too aggressively (as the corner is faster than you think)and then get back on the gas very lightly and then half a millie second after the front end of the car hits the flat track after the downhill and gains huge compression for additional grip turn the car in for a mid apex and then lift up your eyes off the apex and find the end of the tire wall (which you will never see if your eyes are down) and then drive the car with your right foot until trackout.
If you by chance happen to early apex The Downhill and find yourself 2 wheels off track left, DO NOT abruptly turn back on track as most of the worst crashes happen this way. What will likely happen is that your ontrack right wheels will rehook first and then you will shoot across track and hit the wall unless someone accelerating out of the downhill t-bones you at 100mph as you are doing 50mph. If you go 2 wheels off, just keep off track until you slow enough to very safely re-enter.