Turn by turn guide to the Mid-ohio trackFrom TrackpediaIf you know this track then please try to start this guide. Once, someone starts then other readers should refine it to make the descriptions better. But, someone has to be first. Just click the edit button on the top of the page or the right and go.
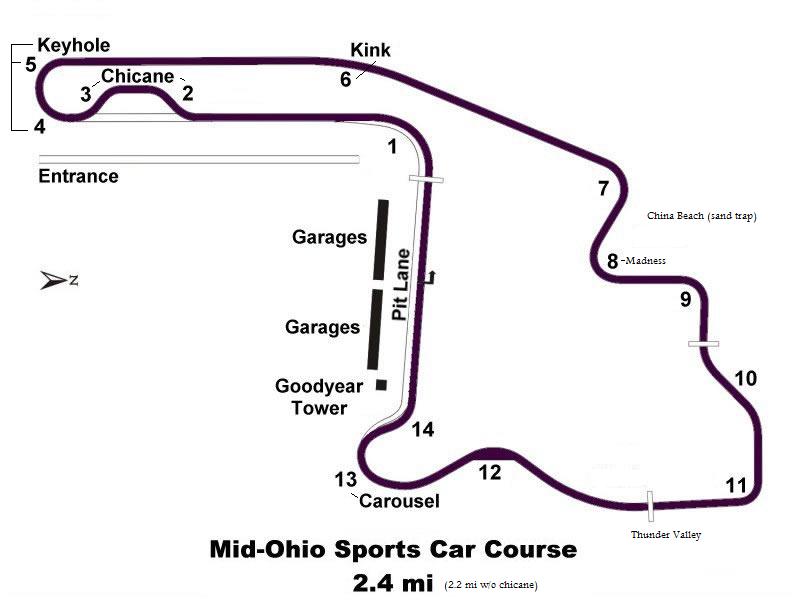
Track Map
Track notesMid-Ohio Turn by turn guide from an MR2 driver in NASA TT Here is a set of comments on the laps in these videos: These comments are verbatim from 'SundayDriver' on rennlist. Overall you look pretty good and very smooth. There are a lot of technical details about Mid Ohio and that is where you can pick up a lot of time. You did take a lot of late apexes - I will comment on each, but overall, late apexes are a very safe way to learn a track so I don't know how much of that was being safe vs. trying to go for the fastest line - that is a call you have to make for each corner. Let me also qualify that after 1000+ laps there, the best I can do is a lap where I feel it didn't suck too much. It is a very hard track to go fast on. Mid Ohio is sooo technical that even the front straight has a line. At the end - maybe the last 20 feet or so, the track wanders a bit to the right. You need to steer a bit and than you can use all of the entry pavement. If you stay pointed straight, you are giving up a couple of feet. Turn 1T1 - Your turn in point seems good but you should turn in sharper for an earlier apex. About mid way on the curb where you are almost at the end of the curb. Unless something has changed with the re-pave, T1 really want to make a car tail happy. Everything I have driven demands a touch of brake and then right back to full throttle (except my twin turbo which was part throttle) to set the rear end. Most cars do not downshift for T1 so this is a great place to Left Foot Brake (LFB). I will caution you about my comments as I usually do 100% LFB and do not use the clutch for downshifts. Turn 2T2 seems fine. You can go deeper into T3 as it is uphill a bit and you will have a lot of grip. You want to miss the apex of T3 by ~ 1/2 car width to set yourself up for the entry to the later part of the keyhole. It is usually a sharp stab of the brakes into T3 and back on the gas for T4 (the second left hand apex). Hit that second apex with the first taken wide and you can carry huge speed through here. You may find that you gain a full second here as it can be very fast. You are cruising through this part and can be full throttle (but it is scary). Turn 5Keyhole T5 - You can go a lot deeper and faster at entry. Again, this is uphill so you have way more braking than normal. Use that and the car will carry outwards about a car width off the inside from the entry speed, rather than driving out there. Mid corner is sounds like you did a little breath off the throttle. This is exactly what you have to do to rotate the car and not end up in the campground from the push. Next time you are there, exit the track and turn right. Go down ~1/2 mile and look back at the keyhole. You will gain a new understanding of why you fight such a big push there. I think you should do a bigger lift/breath and that will allow earlier throttle exiting the keyhole for the run down the back. Turn 7T7 (right hander). This varies a bit for each car - what you are trying to do is use all of the track out, IF you can get back over one car width to slightly widen T8 (madness). Some of the lumbering street cars can not do this and need to manage the track out, but I suspect your car can get back over. In that case, your turn in for T7 was late (turn at the 1 marker) and the apex was late. If you look at the first video at 1:03, the second red block of curb is about where you want to apex. You are all the way at the end of the curb, then do not track all the way out. I bet there is at least 5mph here. Use the little bit of straight to T8 and get on the gas. Turn 8T8 line looks perfect and you are only tracking out ~2/3 of the track - just what you want to do. There is more speed over the top of this corner. That said, it is not much of a gain and a big penalty to push too hard so use your head about trying to get every last bit of speed here. Turn 9T9 makes the car want to push pretty badly (at least it did). If that is a problem for you, turn earlier with slow hands or a little trail braking. The exit here and entry to 10a is dependent on your car. Again, like T7, you want to track all the way out. But only if you can take 10a flat from there. If you have to lift, then you want to give a bit up in T9. Turn 10T10. 10a is find though 10b (the last apex on the right) needs to be missed a bit, just like the keyhole entry. Stay 1/2 car width off this apex and the car will have a much better entry angle for T11. You will have the car under some side load for heavy braking in T11 so that is why you want that better angle. Turn 11T11 is tough and what you do here depends a lot on what you are willing to risk. Unlike T8, there is quite a bit to gain here but like T8, the penalty is big for messing up. First realize that this is an increasing radius corner. The fastest way through is going to have you almost out of control from turn in until apex then the car hooks up as the corner opens up. There used to be signs as a reference - they are gone so you have to use the very old reference of the tree line. Find the dip in the tree line that is centered at 1:28 (slightly on the late side of 1:28) - that is your mark. Back up to 1:23 for entry and follow along. Turn in and apex look good. Just as the time changes from 27 to 28, you are good to go. You are at the apex and the car is under control. You can see the dip just coming into center and that tells you that you are going to make the corner without a lot of steering at the crest of the hill. You can put the throttle down from here. If the dip in the tree line is off to your right, you are going to have to steer over the top of the hill and you need to watch the speed. In your case, you could have gone full throttle a couple of seconds earlier. Again, I am describing the fastest, high risk way around the track. If I don't need the time in a given lap, I back off a bit here and do not take all the risk. You have to be smart in this corner and always decide how much risk you will take. But, it is a real thrill at the limit with the car sliding at entry, hooking up and sliding some more over the crest of the hill. Turn 13T13 has two interesting characteristics. First, the entry is (or at least used to be) a roller coaster of uphill, level, up, level. There were places that you would push like a pig if you turned in, but the car was fine if you turned 5 feet earlier or later. You will have to try to feel that if it still exists. Looks like your turn in and apex were good. You left a good bit of speed on the table. More speed on the same line would have carried you all the way out about half way down the track out curb. When you take this fast, you will have to keep turning a little bit after you get to the curb as the track works back to the left. Turn 14T14 - Carousel - Entry is uphill so you can brake very hard but then need to back off the brakes over the hill. Back to hard bakes as the car settles. Your apex is very late here. Apex earlier and release from the curb at the point were you can carry full throttle through T15. Low HP cars (which includes high grip DSRs and Atlantics) use an apex that is a couple of feet long. High HP (low grip) need to hold the curb for 8-10 feet and release later. The key is to do whatever you need in order to take that final turn at full throttle. In the second video, it was much the same but the late apexes were not as late. You line, in general, was much better than the car you were chasing and the way you caught up in the corners showed that. For not having been there much, the laps look great. There is a lot more speed and it will take a lot of work to extract it. |