From Trackpedia
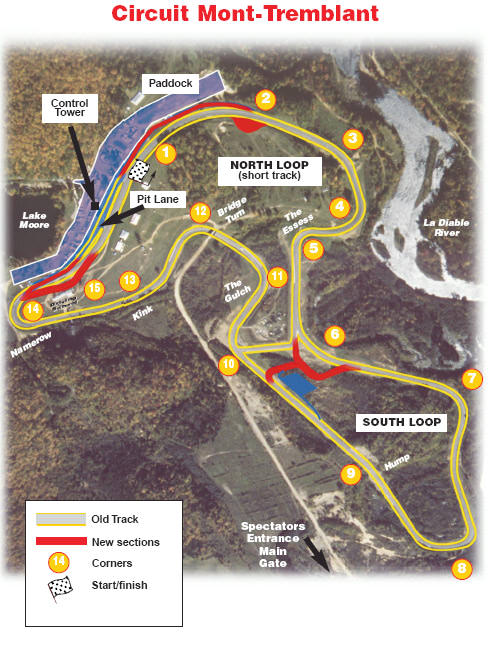
Track Map
Turn 1
The T1-T3 complex is a right hand turn over a hill, with the apex of T2 being the top of the hill.
At the end of the front straight, the track drops off slightly and fades right slightly, just after the drop.
The best way to enter it is to stay driver's left, about 2.5 feet from pit wall. Most driver's will either brake lightly or just do a lift at the end of the front straight before the downhill. If you are against pit wall, you will have to start turning as the car gets light as it starts to go down the drop. The more advanced the driver, the closer they get to the wall.
After the slight drop the track starts up hill again (to the right). It is best to take this turn late since you have a lot of grip due to the compression, and you want to be as straight as possible as you crest the hill (T2). You should not be close to the curbing on driver's right until you are at the top of the hill. The throttle is your friend while climbing and cresting the hill, if the car feels a little skittish going up and over the top, adding throttle and not brakes will get you though.

Turn 2
At the top of the hill, you should be all the way to driver's right, with your right side wheels against or on the flat curbing there. There are a couple of bumps at the top of the hill that can make the car skip left a bit - stay on the gas! Fight the urge to lift or brake and stay on the gas until you are over the crest going down the hill to T3. After the apex of T2, let the car start to track out to drivers left, so you are at the left side of the track going the hill to T3.
To help keep you on line over this blind hill, there is a good reference point you can use. As you crest the hill, you will not be able to see the track down the other side. If you look straigh out to the woods on the outside of the armco, there is a lone birch tree there. Line yourself up with this tree as you go over the crest down to T3. You may want to locate the tree on a warm up lap or track walk instead of a hot lap :).
Turn 3
T3, like T1, is a compression since the track levels out here and turns sharply to the right. Some will want to brake slightly going down the hill before T3, but the more advanced drivers will not as the compression provides a lot of grip. Work up to this. There is a short straight between T3 and T4 where you need to do a lot of braking. Take T3 late, turn in the compression and create a long straight braking zone before T4.

Turn 4
T4 & T5 make up "the Esses" which can be bit hard to get right.
You want to be about center of the track before turning (right) into T4. T4 requires a late turn-in and favors trail braking. Most drivers will go down a gear for this corner. The most important part of T4 is to get setup properly for the left hand T5 so do not track out of T4, stay driver's right at the exit. The correct way to finish T4 is to be parallel along the curbing on the right. Some drivers like to put the right side of the car on top of the curbing to gain more turning radius for T5.


Turn 5
After T4, you want to be straight and all the way to driver's right in the esses to give you the best run out of T5. Let the car track all the way out to driver's right after T5. Stay right for the left hand sweeper that is T6.

Turn 6
Turn 6 - This can be taken flat out in most cars (as long as the track is dry, when it rains you usually get some standing water there), so the exit of T5 is very important.
T6 is a long turn, so you may have to short shift going into it to prevent running out of revs during the corner. Be patient entering T6. Don't turn in too early. In a powerful car one can run out of room on the exit. Let the car track all the way out to driver's right after T6 and then start coming back to driver's left again for T7.
Just a little side note about the exit of T6. There is a deer path in the woods between T6 and T7. More than one car has hit a deer here, so keep your vision wide.

Turn 7
Turn 7 - can be a bit tricky since it is slightly down hill and off-camber going out of it, but as long as you hold tight to the apex (a fairly late one) you'll be fine. Remember to apply throttle at the apex. Many cars have met their end at this corner. After tracking out of T7, stay driver's left to setup for T8. In the wet be careful on the exit. The slight kink before the straight for T8 becomes a real corner.
A note about T7 for drivers visiting Tremblant for the first time. Many are deceived by it and actually think it is as fast as T6. It is not. Fortunately there is plenty of runoff if you go wide. Do not hesitate to go on the grass when in trouble. It will save your car and maybe even more.
Turn 8
Turn 8 (Carousel)- This is probably one of the turns you should start to focus on. It's just before the back straight so a good exit matters a lot.
There is a hard braking zone for T8, where most driver's go down from 4th to 3rd gear. Since T8 is an increasing radius turn, there are three typical lines for this corner: "the early", "the late" or "the double".
"The late" apex line is the student line and is also favored by high HP cars. There are two sets of curbing on the inside for T8, the first being
1/3 of the way into the corner, and the second is 2/3 of the way through the corner. For the late apex line, turn in late and ignore the first
set of curbs. You should get the car turned to hit the middle to end part of the second set of curbing. You sbould be on the throttle well before
the apex with this line.
"The early" apex line is a more advanced line since there is a wall at the exit of T8, so if you are too early, you'll be doing some work to
keep all four wheels on. Trail braking really helps get the car turned into the early apex. You'll want to hit the last 1-2 feet of the first
set of curbing and ignore the second set. If you cannot start getting on the gas after the apex, you're too early.
"The double" line is a mix of the two above. Later than the early, earlier than the late. The times I've done the double, I'd hit the first
set of curbs about 3/4 way along the curb, do a little lift to turn the car, get back on the gas to hit the late apex point.
Turn 9
T9 is a slight turn at the crest of a hump on the back straight. It is not an issue in most cars, but some of the really high HP cars will move
to the center of the track after tracking out of T8 to be straighter over the hump.
Turn 10
T10 is a 4th gear (in my 911)right hand turn at the end of the back straight. Hard braking is required at the end of the straight. Take T10 a little late as you only want to track out to mid track between T10 and T11 so you can get back to driver's right for T11. There are a few bumps in T10, but nothing that is going to upset the car. Do not hesitate to use the curbs here. They are pretty much flat and will not upset your car much if at all.

Turn 11
T11 ("The gultch") is a slightly off camber left hand turn that goes down hill slightly on exit, only to climb again to T12. Only slight braking, or only a lift of the throttle is required for T11, although some people go down to 3rd for power to get up the hill into T12. There are walls on both sides of this corner, so it can be a bit unnerving. Track all the way out to driver's right after T11, to setup for T12.

Turn 12
T12 ("bridge turn"), named because goes under a bridge, is a 3rd (or 2nd in some cars) gear left hander at the top of the hill leading out of T11. It can be a bit scary the first few times as you can't see where the track goes and all you see are cement walls. Due to the uphill, only moderate braking is required approaching T12. The turn-in is a bit blind and a little late. As a reference, as you turn from the turn-in point at the right side of the track to the apex at the left, you should be in the center of the track as you pass under the bridge. Track out fully to driver's right as T13 is a flat out corner.
Some of the higher HP cars take it a little later so they can get on the power early for the run through "the kink" and up to Namerow.
Do not touch the inside curbs of this corner. Unless you are in a "drifting" competition you will upset the car too much.
Turn 13
T13 ("the kink"). Can be taked flat out.

Turn 14
Turn 14 (Namerow) is best described as a throw away turn. T14 is a sharp right hand hairpin with an uphill entry. The turn-in point is just after the crest of the hill as the turn drops off again. Due to the slow cornering speed in T14, heavy braking on the uphill approach is necessary. Just ensure you are off the brakes by the crest of the hill as the car gets a little light. Take Namerow late so you exit the corner on driver's right for the straight between Namarrow and T15. You do not want to track out to the left since you need to setup for the fast left hand T15.

Turn 15
T15 ("Paddock bend") is a flat out 3rd gear left hand corner in my 911. It is important to be fully driver's right on entry, making the exit of Namerow crucial
to carrying good speed through T15. This corner leads onto the front straight.