From Trackpedia
If you know this track then please try to start this guide. Once, someone starts then other readers should refine it to make the descriptions better. But, someone has to be first. Just click the edit button on the top of the page or the right and go.
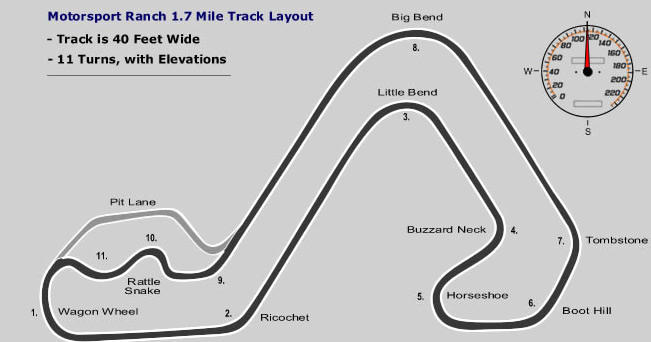
Track Map
== Turn 1 == Wagonwheel
In the counter-clockwise direction, turn 1 is uphill but it's also a decreasing radius double apex corner so beware that you need to apex it late so you don't run through the rumble strip and into the grass the exit.
A different point of view:
Actually, if you drive the fast line, its not a decreasing radius turn. (104 ft driving-line radius) This is place that the DE's teach poorly. If you track out to the right at the bottom of the hill, like they tell you, it turns into much slower corner, because you upset the car by steering right and then back left for apex. Keep the wheel clocked and just accelerate up the hill. Its a long continuous radius, with a single steering input, from entry to exit that gets the fastest times through this corner.
== Turn 2 == Richocet
Turn 2 is a deceptively fast corner, because it is the widest turn on the track (427ft radius). It is downhill and off-camber. If you make use of the whole track you can really carry speed here. But, get back on the gas after turn in, if you are not on the gas well before apex the back end will slide down the hill and its impossible to correct.
Fast divers point the car slightly left of the apex cone and with power on let momentum drift the car past the apex. But don't even think about lifting here. Also, there is the risk of rollover, if you cross over the apex curbing.
== Turn 3 == Little Bend
Obvious enough, turn 3 is another slight-decreasing radius corner followed by a straight so you'll need to late apex it to get the most out of it. The elevation through this corner is pretty flat though and it's not too tricky. There are 2 bumps just after apex, if you are on the right line.
The racing line is to start the turn from the middle of the track, and late brake into the corner, to cut off the car in front of you. This is a faster entry, but the exit is slower. This is the defensive line not the fast line.
== Turn 4 == Buzzard Neck
Turn 4 is interesting. If you try to maximize your speed through turn 4 and run to the far left edge of the track for the exit, you'll need to get back to the right of the track pretty quickly for turn 5. So I preferred to take it slightly slower so I could aim to be 8 feet or so from the left edge of the track for the corner exit, and then I could properly setup for turn 5. But I'm not sure about this one, I may change my line again next time.
A different point of view: A very high or a very low HP car will want to use 4 to get to the right side of the track for 5, as described above. But, cars in the 250-400HP range should to use the whole track on exit. A car width off the left edge is fine for your entry into 5. Accelerate out all the way to the left side rumble strip and keep your foot in flat it until you get to the braking zone of turn 5. Accelerating all the way through 4 will make up some time that you will loose to the high HP cars going uphill in turn 5.
== Turn 5 == Horseshoe
Turn 5 is uphill again, but it is still very tight. There is negative camber on the left side of this turn, but positive camber on the right. You choose: Bigger radius, longer distance, higher speed by going around the right edge OR the shorter line on-camber.
How you take this turn really depends on your car. Its very uphill so low HP cars need to maintain speed should take the longest flattest line. High HP cars can use that same wide line to accelerate briskly up the hill. But cars in the mid-range (250-400HP) are suited for taking the shorter line.
The shortest line: This is a 109 ft radius corner if you take the shortest line. Don't try to track out from turn 4 to the right edge for a normal entry. This is a slow uphill turn. Mid track or even a car width off the left edge is fine for entry to this corner. Times are lower in this section by going "flat" up the hill hugging the left edge. Keep the wheel clocked. Don't steer out to the exit, let momentum move the car right. Then at track out up-shift for turn 6.
== Turn 6 == Boothill
(398 ft driving line turn radius) Turn 6 and 7 combine to make the longest turn on the track. You have to get these turns right to lower your lap times. You can carry a lot of speed through turn 6. However, this is another area where you have a lot to lose. You'll want to string turn 6 & 7 together to make a nice long double apex corner out of it. To do this it's good to come close to the outside edge of the track at the end of turn 6.
DEs teach that 10-12 feet off of the apex is a good line. At the most, 3 or 4 feet of the apex works at speed. A session driving the track clockwise, makes it clear that hitting the apex is really fastest in this corner.
== Turn 7 == Tombstone
Turn 7 is a slightly faster corner than 6, and if you did turn 6 right you should have been accelerating through the end of turn 6 and all the way through turn 7.
A different point of view: Yes it feels faster, because you have a straight exit. But this turn is actually slightly tighter than turn 6. (371 ft drive line radius) You should be holding the wheel clocked still from turn 6 and as soon as you can look through the corner make a small input. With 300hp or more you should be at the maximum possible speed coming out of 6 and can only accelerate in 7 after you reset the steering input, just a tiny bit, for the apex of 7. Its important to look to the exit and adjust your steering early. If you are late, then you have to slow down a bit or risk a spin.
== Turn 8 == Big Bend
Turn 8 is an increasing radius corner for a change. You'll still want to late apex it but not as late as some of the others.
You have to work into the apex of this corner, keep turning the wheel slowly in all the way to the apex. Lots of bumps at exit, you have to keep the car balanced and on power through the bumps. Be prepared to open the wheel if the bumps upset the car, or risk a spin.
== Turn 9 == Rattlesnake 1
I think the straight before turn 9 is the fastest straight. And the braking zone before turn 9 is probably the bumpiest part of the track. So be prepared for a little hopping and skipping if you have a stiffly sprung car. You may also need to brake a little earlier than you think because of this. Trailbraking works well through here as you tighten into this corner but you'll want to aim for a very late apex to set yourself up for the sequence of turns coming up.
Different point of view: Fastest way is not taught at an DE. Continue braking as you dive straight line from the left edge toward the right side curbing (aiming 12 feet from the start of the curbing). Trail brake as you tighten your steering going up the hill. Sharp final steering input as soon as you seen the right curbing disappear. Accelerate for about 6 feet as you turn the wheel left toward the next turn.
== Turn 10 == Rattlesnake 2
Turn 10 it a very low speed corner and you'll want a slightly late apex, use the whole track out and get ready to setup for turn 11 immediately. Going onto the Rumble strip is too far, making turn 11 too tight and slow.
== Turn 11 == Rattlesnake 3
Turn 11 is a little faster than 10 and you should again aim for a slightly late apex. Stay right as much as you can to set yourself up for a faster entry into turn 1.