From Trackpedia
Track Map
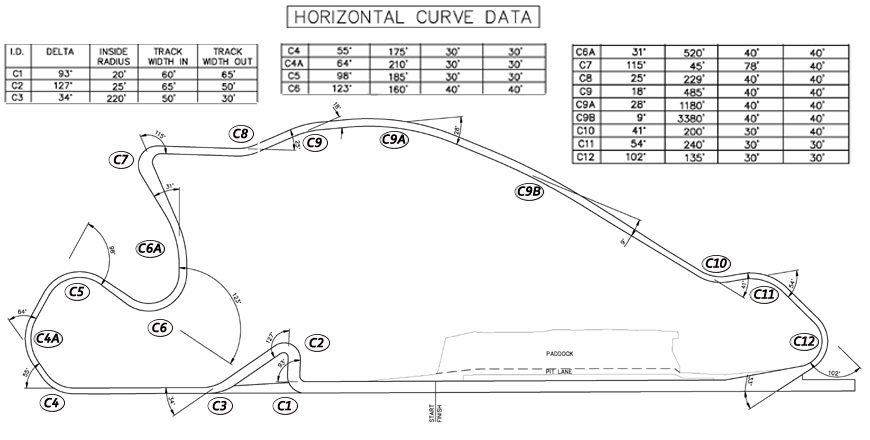
Turn C1
When the "Festival curves" (also called the chicane) are in place, this is the first turn at the "end" of the front straight (about 2/3 of the way down the full-length front straight). It is a right hander that leads immediately into a quick left hand turn. Set your car up to the left about half a car's width or so (in the dry) from the wall. Apply full threshold braking at about the 500 to 400 foot markers; down shift to third; turn in at about the 0 marker; run your right front tires over the painted rumble strip (marked by tire rubber). As you pass the apex of C1 and unwind the wheel, put your car about in the center of the track.
Turn C2
C2 was widened and repaved with new concrete in the spring of 2005. Where once you could find yourself in the pea gravel if you overcooked C1, now there is a fairly flat concrete FIA curb, so there is some room here, compared to the old setup. Most folks downshift to second between C1 and C2 (or entering C1). In any event, let the wheel unwind coming out of the the C2 apex all the way to the track right rumble strip and then drift out off the fog line a bit approaching C3. If you have shifted to 2nd, upshift to 3rd before hitting C3. Most cars will run the entire series of turns that follow leading to the back straight in 3rd gear.
Turn C3
C3 is a little right hander back onto the main straight. No braking needed; your are WOT here. You do *not* want to hug the fog line in your approach and hit the apex at C3; a better line is about 3 feet or so off the fog line heading to a somewhat wide turn in; then drift the car to track out left along the fog line heading toward C4 entry.
Turn C4/C4A
Enter Turn C4 along the fog line track left (as close as is comfortable). Turn C4/C4A is shown to be a "double apex" right hander on the map, but it really involves missing the first apex completely (staying well left at turn in) and hitting the second apex (C4A). It is basically a sweeping late apex turn; the first apex does not factor at all. With the chicane in place, braking here is more a matter of settling the car (braking between the 200 and 100 foot markers) and scrubbing a little speed before turn in. However, with the chicane *not* in place, you must scrub much more speed out before turn in and it is a more tricky turn without the chicane. There is a slight rise on the track about 600 feet or so before Turn C4 that crests then drops off approaching the braking zone. It's a good idea to scrub most of your speed going up the rise, easing brakes over the crest, then going back to moderate brakes before turn in. Once in the turn, it's mostly a matter of throttle steering at a fairly high speed and staying left for the first half of the turn, then turning into the second apex. Unwind exiting apex to track left and go back to as much throttle as your car will handle *very* briefly; prepare to press/brush brakes for entry into Turn C5.
Turn C5
Approach turn C5 on the left, apply moderate brakes and turn in roughly as you reach the end of the curbing. The apex is a little late here; let the car run out to the rumble strip edge then back to the middle-right approaching turn C6 turn in. On the right line, very little turning input is needed once you set your turn. Some folks teach to get back all the way to right for setting up to C6, but the main thing is to be settled, going straight, and mostly to the right approaching turn C6.
Turn C6
Turn C6 is a moderate speed, late apex left hander. Hitting this turn correctly allows you to carry a fair amount of speed into turn C7. The "apex" is really into turn C6A, according to the map. At the exit of turn C6, let the car unwind, going to WOT. Different cars are apt to find different optimal lines through C6/C6A.
Note about winter 2007-2008 layout change: This particular corner exit opens into a vastly changed part of the track. Where there once was a relatively narrow chute to the righthander (C7 in the new map), there is now a large, slightly off camber "parking lot" sloping slight off to the right. Where cars were once at risk of running out of room to the right at exit if carrying too much speed here, there is now quite of bit of room. However, it is still important to get back to the left side of the track to setup for turn in to C7. For the purposes of racing, this looks like an interesting new passing zone.
Turn C6A
Turn C6A on the official map is mostly an extension of Turn C6 rather than much of a distinct turn. If you are going to "hit apex" for C6/C6A, it would be somewhere toward the leading edge of C6A. However, going through this part of the turn roughly near middle-in of the track allows for good acceleration, while promoting a smooth transition to the left side of the track. Entering turn C7, you want to be settled and back to track left for braking and turn in. For HPDE purposes, getting all the way back to the fog line at track left for the setup to C7 seems to work well.
Turn C7
Turn C7 is important because it is the entry point into the back straight. You want to be well left at entry under moderately hard to very stout braking (depending on your car and speed). The entry to mid-turn is slightly banked (about 5 degrees) which may give you a little bit of extra grip; however, in the wet you will want to watch for the rivulets crossing the track. Front engined cars may see a lot of understeer on turn-in, so expect to brake earlier than you might expect -- for example, you might use the track seam as a marker where it crosses the line.
Note: In the old layout, most cars normally handled this as a third-gear turn. Not a very fast one, but still fast enough to exit in a workable RPM band. Not so much with the new layout. C7 is more acute than with the old layout and most cars, especially momentum cars, will find it painful to ride this one out in third gear. Whatever gear you choose, you'll probably be going slow enough to be looking for a downshift while braking in order to find some torque at exit.
As for turn-in, this is another late apexing turn. After downshifting, and as you pass the curbing on the right, look to the (late) apex and turn-in sharply. As you you start to unwind, you can pretty much go to WOT or nearly WOT through the next couple of little turns into the back straight. Track out to the left and try to keep the nose as straight as possible threading toward the back straight. It does help to drift slightly to near mid-track as you approach C8 in order to straighten out the transition through C8 and C9.
Turn C8
Turn C8 is quick left turn that leads directly into C9 and the back straight. Stay to the middle of the track as you exit C8, rather than running all the way to track right. You want to be going through C8 going WOT, and by now into 3rd gear.
Turn 9/9A/9B
With the old layout, a series of bumps near the apex of C9 (the wall) could potentially unsettle your car as it rounded turn C9. That's really no longer the case and it is easier to make a clean, close pass by the C9 apex.
You still want to be going WOT through C9, whether you make a close pass to apex or not. As you exit C9 and head to C9A/C9B, you should be going WOT; a good line is to stay in the middle of the track through C9A and C9B (which really form the long, curving backside straight) heading to turn C10. Depeding on your car, you could upshift all the way to 5th before going to brakes into C10.
Note: Be VERY careful getting to the outside edge of the track through C9/9A/9B. While work was apparently done as part of the track repave/redesign to flatten the surface back here (was previously slightly off camber), there is often debris out there since most cars run middle-in through this turn -- and the car is turning, if only slightly. In the fall, going through wet leaves can be dicey at track's edge.
As you straighten out heading to turn C10, let the car drift close to the wall (like 3 feet or so).
Turn C10
Next to the changes in the C6 to C7 transition, this is probably the most significant change to the course layout, although it is more subtle.
In the dry, as you approach C10, you are well right and relatively close to the wall for entry under moderate braking; when you turn in (around the 0 marker), you'll want to stay off the rumble strip, but as far left as possible. Typically cars come into turn C10 in 4th gear. You might or might not want to downshift to third, but it is not really necessary until you are into hard braking for turn C12. In the dry, you can carry good speed through C10 and C11; throttle steering until you brake for C12. Setting up for C11, point the car to drive from turn C10 apex to C11 apex in as straight a line as possible.
Note: In the old setup, turn C10 was a very high speed turn (in the dry). You could early apex and run both left-side wheels all the way up the far left edge of the flat curbing and virtually straighten out the transition for C10 to C11. Not so much anymore. The old flat (and quite wide) concrete curb has been replace with a much narrower curb (with low rumble strip). There is no doubt that this turn is slower in the new configuration.
Turn C11
The turn C11 apex is relatively early; there's no need to touch the brakes until turn C12; exiting turn C11, track out to the left along the fog line (the track exit road is here as well) pressing throttle to WOT briefly. Follow the fog line into the braking zone for turn C12.
Note: In the new configuration, C11 is more of a turn than in the old configuration. While not requiring any braking, it is just not as fast -- mostly because the setup from C10 is not as direct/straight.
Turn C12
As you pass the exit road, turn in a little less than a car's length beyond the point where the pavement from the exit road and the track pavement meet. Late apexing this turn will help get a good run at the main straight. Track out to the fog line that takes you out to the main straight wall; stay as close to the line as you are comfortable. There are a series of walls here at trackout (which can be unnerving to the newcomer), but do not take a low line as it can definitely unsettle your car and cause your car to swap ends -- especially if you lift at all (perhaps setting up to let someone by). It's best to stay left and WOT until you are definitely heading down the straight going by the wall.
Notes
The description provided here is written with the newcomer HPDE driver in mind -- not racers. It is also written with a dry track in mind.