Turn by turn guide to the Roebling Road Raceway trackFrom TrackpediaIf you know this track then please try to start this guide. Once, someone starts then other readers should refine it to make the descriptions better. But, someone has to be first. Just click the edit button on the top of the page or the right and go.
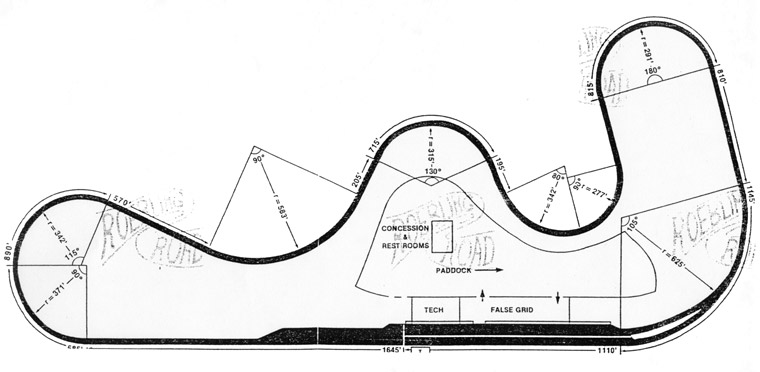
Track MapTurn 1As a quick intro, remember that quick lap times at RRR are in the corners. Most of the corners do not lead onto any significant straights, so the trick is not how to get exit speed, but how to maintain the highest mid-corner speed. The obvious exception being the carousel and the final corner leading onto the main straight. Now, to T1... This is a fast track, so you might be braking from the highest speeds you've ever seen when entering T1. Still, the braking zone is not as long as you might think because T1 is quite fast. You'll probably be downshifting to 4th. Turn in is at the '1' sign. Apex near the end of the inside curbing, but don't be all on top of it. Leave a little extra room at the apex of T1 so that you can drift back to the left for the entrance of T2. -Michael Skeen Update... new pavement as of 2007... no more patches! It's now June, and the track looks REALLY good. No sealer, no broken areas, nice and smooth with one exception (see turn 9) Turn 1 is now a fully 4th gear turn for most cars. Probably not flat out, but you'll be in 4th scrubbing off speed from turn one to make turn 2. Depending on your mechanical grip and/or your gearing and power, you may be able to hold 4th through T2 as well. Your lines will vary. Stack As you enter the braking zone, shift your eyes to turn exit and tell yourself that it's a large radius turn that doesn't require much braking. -Scott Gress Turn 2From T1, you should be drifting towards the left half of the track. A little bit of braking here to rotate the car is good, and turn in for T2 from left of center. You can get on the power here very early and use all the curbing on the inside of the track. Track out comes pretty naturally. After exiting track left, smoothly ease back to the opposite side of the track to set up for T3. -Michael Skeen Turn 3This corner is VERY fast. Enter from right of center and turn in with one smooth motion that will take you to the left of center early in the corner. Stay away from the oustide curbing, as the road is a bit off camber out there. Some cars will be flat through the whole corner, others will only need a slight lift (DON'T LIFT after entering the corner). If you're in something really fast, you might need to brush the brakes. At least keep "maintenance" throttle through the corner to keep the back end planted. Look way ahead to the curbing at the apex at the end of the corner. As soon as you can see it, you should be creeping full track left, hugging the inside. When you finally get to the curb, you should be touching the grass, all the way over the curbing. Let the car track out right of center in order to unload the car for the braking zone entering T4. It is important to keep your speed high going through T3. There's no reason to think "slow in, fast out" here because there's no straight after it. If you shed your speed to use a late turn-in, you've got no place to make that speed back up. Run the widest arc with the least steering input possible in order to keep your speed high. -Michael Skeen As you enter the turn be thinking about how you are going to get the car unloaded relatively early at turn exit. A fast turn 3 puts you into turn 4 in an eyeblink. That can put one in a pickle where the car is still under significant lat g's, yet you have to start braking hard or you'll not make turn 4. -Scott Gress Turn 4This is a significant braking zone if you have carried maximum speed through T3, probably requiring a downshift. You have compromised the entry speed of T4 by tracking out of T3, but done correctly, you have more than made up for this by carrying maximum speed through the faster part of the sector. You will start the brake zone for T4 from the right, easing the car to the left until the left tires touch or just cross the center line of the track at turn-in. Look ahead to your apex and turn in, aiming to use all of the apex curbing. Track out just a few feet over the centerline and you will have to turn in for T5 almost immediately. -Michael Skeen Turns 5 & 6Coming out of T4 you will be in the middle of the track; turn in while still on the gas and apex at the end of the first curb on the left while aiming for the middle of the road in the center of T5/6. Bleed off the throttle once you've passed the first apex and let the car drift out towards center track. Brush the brakes a little here, rotate the car, and get back in the power while driving towards T6. Hug the inside line over the curbs all the way through the second apex (T6), track out full track right. Again, we are trying to maximize mid-corner speed because there is not much of a straight before the carousel. -Michael Skeen The objective of the technique that follows is to be able to carry as much speed possible thru the "rotation point" at mid turn. This is a line for low hp cars. Separate the turn into 5a and 5b. 5b begins when you rotate for the second apex of the turn. Rimshot 5a. This isn't quite as fast as taking the school line thru 5b but the difference is minimal because a low hp car won't be very fast here anyways. As you approach your turn-in point that defines the second half of the turn, you won't have to rotate the car very much because of your choice to rimshot 5a. This will allow you to carry more speed thru the turn 5b turn-in, and you will carry that speed to turn 6. This rimshot 5a technique also makes it easy to execute the turn 5b turn-in from the very edge of the track, which allows you to use every inch of track width. In contrast, when you take turn 5 as a classic double apex, you approach the turn 5b turn in while traveling ACROSS the track. And that means more rotation will be required, and it also will make you reluctant to execute your turn-in at the very edge of the track width. A Miata driver showed me this line. It has few fans because folks get wrapped up in taking 5a conventionally because it's a faster line thru 5a. But I think that more emphasis, for low hp cars, needs to be put on 5b, and carrying more speed thru the turn 5b turn-in is the way to do it. -Scott Gress Turn 7The carousel is an important corner because it starts the run onto the main straight and the exit is uphill. You will approach the corner in the middle of the track (not on the left, because the entry is downhill and off-camber). You will only use the brakes a little bit on entry to balance the car and keep weight on the nose as you turn. Quickly pick up maintenance throttle and progressively accelerate as you look for the apex curbing near the end of the corner. Use every inch of the road here and at your track out. The exit curbing is very flat and should be used. -Michael Skeen Turn 9Turn-in is at the crest of the hill where the track begins to turn. Do not stay at the left too long because the road is slightly off camber at the edge. Look way ahead. Find the V-shaped curb where pit lane goes right and the track goes left. As you approach this you should have your right side tires on or inside the white pit-in line. Your right side tires will run parallel to the first half of the curb and then run over the curb when you reach the grassy section. At this point, the road goes uphill very slightly and your car will get a bit more grip. Again, look way up to your track out point and open the wheel smoothly. If you realize that you are not going to keep the car on track, let it go. There's a huge field to drive through track left, but a cement wall track right. Where do you want to end up? -Michael Skeen There's two places to find extra traction in turn 9. The first is in the inside gator, because it drops about a 1/2". A tire will fit neatly inside if you made the right decision at turn 9 turn-in and the car's path will be the same as the gator's path. The other extra traction is just after the turn9 apex the track pitches up a little, pushing the car down. So go into turn 9 (from center track) faster then is survivable, and then use the gator and track pitch-up for the additional traction that allows you, to your surprise, to make it after all. -Scott Gress |

