From Trackpedia
If you know this track then please try to start this guide. Once, someone starts then other readers should refine it to make the descriptions better. But, someone has to be first. Just click the edit button on the top of the page or the right and go.
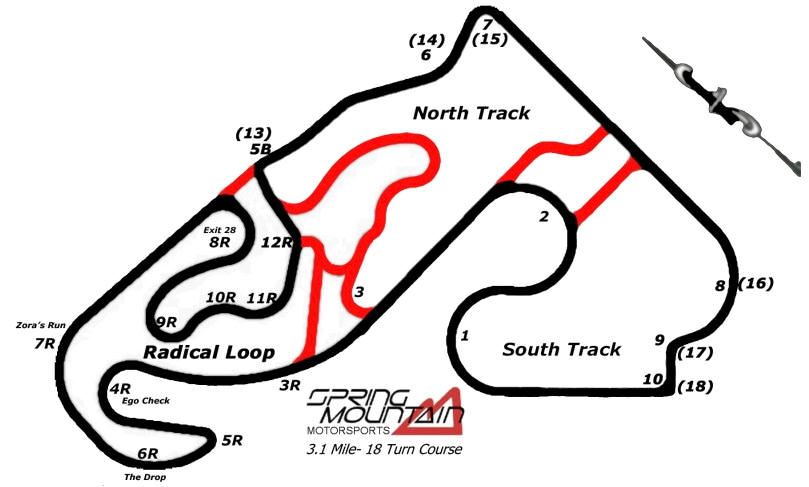
Track Map
Turn 1
Turn 1 is a fun easy sweeper. Watch for traffic exiting the pits as you come down the front straight. There are two walls right after the pit exit that stop well before turn 1 starts. I use these walls as a marker for my braking zone. It isn't a hard braking zone at all, but I lift when I get to the walls and do a quick moderate brake check and into the sweeper I go. I stay somewhat close to the outside and apex right at the end of the radius.
Turn 2
Turn 2 is just like Turn 1, but the other way. In between turns 1 & 2 I like to make a straigt away right after the apex of 1. I get on the gas hard for a second and then lift and a possible light tap on the brakes going into 2. Turn 2 has a little bit sharper apex coming out of it so be ready to turn in as soon as you spot it. Just after the apex is a small bump that if hit the right way under heavy acceleration can send you around. Track all the way out to the rumble strip entering the next straight and then get back over to the left side of the track.
Turn 3
Turn 3 is used in the 2.1 mile configuration and is a tricky turn. It is a hard braking zone with a really late turn in and late apex to hit right. This is the turn that I have the most trouble with because it is decieving how late you should turn in.
Turn 3R
Turn 3R is VERY high speed. Radicals are pushing 170mph into turn 4R. It is a very easy turn and I keep my foot in it all the way to the next braking zone. While in turn 3R stay wide and cut in just before 4R giving you as much of a straight line to use as a braking zone as possible.
Turn 4
Turn 4R
Turn 4R, appropriately named "Ego Check" is an off camber decreasing radius. A very tricky turn, especially after the fastest section of the track and the hardest braking zone. Coming into Ego Check is a hard braking double downshift entry that hopefully you set yourself up for in turn 3R. Slow way down for this turn. and remember that its a decreasing radius. I apex a little sooner than most and track out to the right side of the track between here and 5R. Then its straight back over to the left before I downshift into 5R.
Turn 5B
This is turn 5B in the 2.1 mile configuration, but turn 13 in the 3.1 mile configuration. When its turn 5B it is the second part of a really fun double apex. Use the rumble strips on this turn both on the apex and exit.
Turn 5R
Turn 5R is a slow speed, slightly banked hairpin. Go slower through this turn than you think you should be because the slight banking isn't that much of a help. Hit your apex and track out, but not all the way out to the inside. I like to make the exit of this turn one big sweeper until turn 6R.
Turn 6
Turn 6 is an easy fast turn if done right. Late apex it a little and create a big straight line braking zone going into Turn 7.
Turn 6R
Turn 6R is called "The Drop" and that is no exageration. It is a severe elevation change. When done right it is an awesome feeling. Upon exiting 5R I never track outside all the way. Instead I stay turning and by the time I reach 6R I am on the inside of the track. Literally right before The Drop, I straighten out my wheels really quickly and go off of the drop straight. By the end of the drop I am already back on the outside of the track preparing for the next turn.
Turn 7
Turn 7 is another hard braking zone and possible double downshift depending on your car. The apex is really easy to spot, so just look ahead, get all your braking done and mash the gas as soon as you hit the apex. Track all the way out to the rumble strip and down the straight you go!
Turn 7R
Turn 7R is named Zora's Run after Corvette legend Zora Duntov. This turn is another elevation change, but not as extreme. It is like a small hill. I apex right at the top of the hill and track out to the rumble strip going into the next straight away. *Hint, from the exit entrance of 5R to the exit of 7R is one big turn for me only straightening out for a second to go down The Drop.
Turn 8
Turn 8 is a high speed sweeper that everybody likes to take differently. Its after a long straight away so there is some pretty heavy braking involved going into it. I like to make this turn into a double apex. I enter on the inside of the turn, track out to the outside, and late apex it coming into 9. When done this way, you can create a straight between 8 and 9 which becomes a good hard braking zone.
Turn 8R
Turn 8R is a late apex slight off camber turn. Its at the end of a straight away and has a nice wide entrance so you can do some really late braking if needed. This turn has a little less grip than you would expect because of the ever so slight off camber to it. Its a late apex as well.
Turn 9
Turn 9 is a hard left after a heavy braking zone. I late apex it a little bit so I don't have to track out too far because there is little room between 9 and 10. A quick tap on the brakes between the two and then I enter turn 10. Turn 9 is also where the pit entrance is.
Turn 9R
Turn 9R is a very very very very late apex. When entering the turn you spot your apex by turning your head 90 degrees to the left out of your driver's side window. Stay wide all the way through the turn and then cut hard to hit this super late apex.
Turn 10
Turn 10 is a little bit of a tricky corner. Its a slight late apex that you want to enter into slow. This is the only turn where you have to worry about a wall. The pit wall is on the inside of this turn and what happens is, people enter the turn too fast or apex too early, then they end up putting two wheels off on the exit and then they get pitched sideways and shot into the wall. Just take this turn slow and at your own pace. After a few laps you will get the hang of it.
Turn 10R
Turn 10R can be taken quite fast if you setup for it in 9R. Clip your apex, but don't track all the way out to the rumble strip because you want to be back on the right side of the track fairly quickly.
Turn 11R
Turn 11R is also another decievingly fast corner. Keep your foot in it and track way out after the apex. Use the entire track exiting this turn. Swinging really wide will also set you up for the next turn.
Turn 12R
Turn 12R is a very mellow dog leg if you set up for it on the exit of 11R. Clip the apex and swing wide again. Entering into 13 you want to brake in a straight line across the track from the right side to the left. This won't work so well if you have a faster car coming behind you, but if you are all by yourself this is the way to go.
Turn 13
This is a hard 90 degree right hand turn. Basic principles get all your braking done before you turn in, cut hard and clip the apex and then track all the way out and utilize the rumble strip on the exit.
Turn 14
See Turn 6.
Turn 15
See Turn 7.
Turn 16
See Turn 8.
Turn 17
See Turn 9.
Turn 18
See Turn 10.
