From Trackpedia
If you know this track then please try to start this guide. Once, someone starts then other readers should refine it to make the descriptions better. But, someone has to be first. Just click the edit button on the top of the page or the right and go.
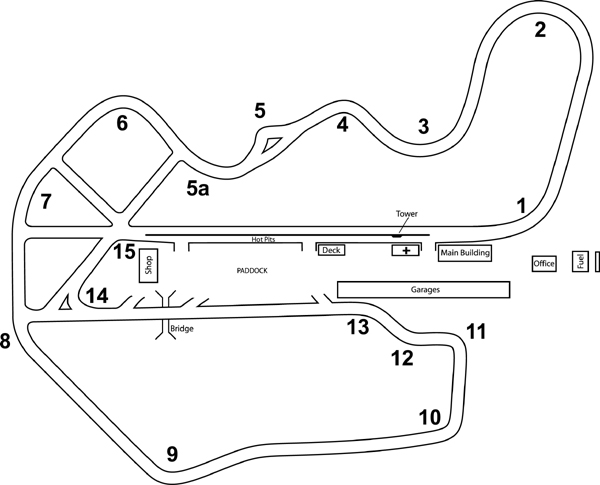
Track Map
Turn 1
Turn 1 is a high speed, blind, rising left hander. Typical speed for sedans is between 90-100mph. I reccomend approaching this turn with caution on your first few visits, this is an easy place to get into trouble.
You approach turn 1 after the long front straight. As you pass pit exit on your right, check for merging traffic, then drift smoothly to the right side of the track. As you center the wheel, prepare to do your braking. There are 4 brake markers. Most ITA racers will brake just before the 3, while track dayers may want to brake well before the 4, or earlier if it make you confortable. SMOOTHLY apply your brakes, light to medium pressure is all you need, and be equally smooth off. Turn in gradually at the 1 marker, and crack open the throttle for stability. The most common mistake at this turn(besides getting loose on turn in) is to turn in too early, or carry in too much speed. Both conditions result in going wide at the exit. Don't panic. You make be going 100mph, but the dirt is usually firm, and there is plently of room to merge back on the track. If you try to save it, you are on your own. Many a car hath flipped here. No matter how smooth the dirt and grass are, 90 mph sideways off track rarely ends well, not to mention that the corner is slightly blind and other driver will have trouble avoiding you if you spin back across in front of them.
Turn 2
Welcome to flat track oval racing! This is a good place to pass. There are about as many ways through turn 2 as there as drivers, but most tend to go with a super late apex approach. You will aproach the entry at about 105 mph. Feel free to experiment with braking late here, since there is alot of room to play. Brake down to about 75-80mph, or whatever you car can hold in steady state cornering. Some people enter wide, but most start this turn near the middle of the track. They key to turn 2 is to be PATIENT. Don't get on the throttle to early, and resist the urge to drift in and apex. It is a LONG turn. The apex is marked by a small overrun almost 3/4 of the way through the turn. When this is in sight, start to move toward it when you can pass it at full throttle. This turn is pretty easy, almost boring, but takes alot of practice to get right.
Turn 3
When I think of off camber turns, I automatically think of Turn 3 and Turn 5 at Thunderhill. This turn starts off off camber, but tends to flatten out at the end. This turn marks the begining of the 3-4-5-6 element of the track, which are very crucial for good times around this track.
The "Classic" line:
This is the line taught by most NASA and SCCA instructors. It begins with entering this right hander from the RIGHT side of the track, maybe a car width out. The reasoning here is that the camber actually gets worse the further from the inside, making it hard to find traction if you use a traditional wide entry. Slight brake at the 2 marker, then hug the inside but do not apex. The Apex for turn 3 is actually the turn in for 4, so don't drift wide on your exit.
The Alternative line:
I think this line is actually more traditional. It involves a wider turn in point. Move to the left of the track to set up for the right hander. Brake a little later than the classic line, and trail brake into the corner, aiming for the center of the track. This allows you to carry alot more speed and brake later because your line is more "open" than those taking the classic line. It is also a good way to pass on entry into this turn. As with the classic, you start to drift in, hugging the inside only when you are about 2/3 though the turn. The trick here is to not enter TOO wide. Their is a reason the classic line exists, and because most cars avoid this part of the track, it will be dirty and full of marbles. Experiment a little.
With both techniques, be careful not to roll on the gas to hard or early, or you will go wide for your entry to turn 4.
Turn 4
Turn 4 is fairly routine. A brief lift to transfer weight to the front and then turn in and get back on the gas.
If the 'bypass' is turn 5, then the line is to track out to the middle of the turn 4 exit berm, then swing back so that you crest the hill slightly left of center with the wheel straight.
Turn 5
If using the 'bypass', come over the crest, wait for the suspension to set (about half way down the hill), then gently turn in. Grip is good and the exit is completely on the right edge of the track to set up turn 6.
Turn 6
This turn is slightly sharper than 90 degrees and turn in is quite late. The inside berm has a 'point' which is a good apex location.
Turn 7
Turn 7 is really just the bend in the 'curved straight' from turn 6 to 8 and is fast (full throttle). If open passing is permitted, watch out for cars that misjudge the speed difference and unwisely try to squeeze by on the inside before the apex. If they are smart, they will wait to pass between 8 and 9 or 9 and 10. If you want to force them to wait, make your car wide by moving to the left a car width immediately after tracking out from turn 6.
Turn 8
Turn 8 is one of the fastest turns on the track, but is visually deceptive. Grip is good and there is extra trackout room. Use caution, since going off-track at 95-100 MPH is unwise. A common racing line is to turn in at the beginning of the outside berm, apex at the start of the inside berm, then drive on the last half of the exit berm. A common HPDE line is a later turn in, later apex, and avoid driving on the exit berm.
Turn 9
Turn 9 is an uphill turn leading to a crest. Turn-in is slightly early (between the 2 and 1 markers), the inside berm has a 'point' that serves as the apex. Tracking out all the way requires confidence because of the impression of driving along a cliff. At track out, the wheel is straight when going over the crest.
Turn 10. Braking before turn 10 requires caution, since speed is high and the track slopes downhill. The turn is banked and fairly fast.
Turn 11/12/13. High horsepower cars will sacrifice 11 (very late apex) to straighten the path through 12 and 13. For these cars, the exit from 11 is completely to the left. Low horsepower cars will exit 11 middle of the track and then enter 12. Driving on the berms for 12 and 13 is OK in the dry.
Turn 14/15. Braking before 14 requires caution, since speed is high and the track slopes downhill. With open passing rules, the entry to 14 is an ideal spot for passing under braking. The entry to 14 is ideal for trail braking. The apex is 14 is late, and by tracking out wide (driving on the bumpy yellow painted asphalt), 14 and 15 can be combined in to a sweeping turn. If driving on the bumpy area, the turn in for 15 is the end of the yellow section.