From Trackpedia
If you know this track then please try to start this guide. Once, someone starts then other readers should refine it to make the descriptions better. But, someone has to be first. Just click the edit button on the top of the page or the right and go.
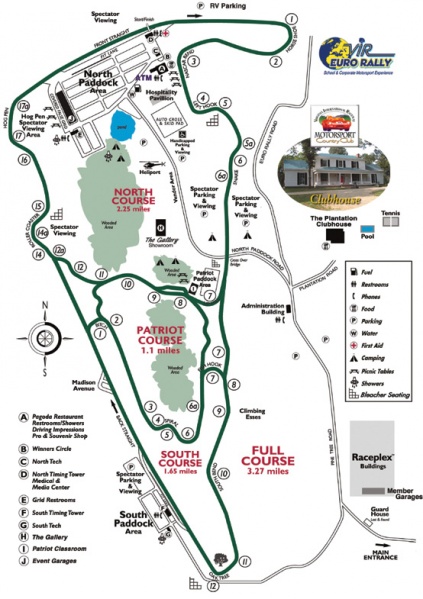
Track Map
Turn 1
This description assumes a 2:00 - 2:05 lap time on the full course.
It is important to set up for turn one correctly so that you'll be positioned properly for turn 2. Apex turn 1 late as you'll be arriving there at a high rate of speed (coming off a long straight) and you'll want to start at the outside left and work your way to the apex about 3/4 of the way around this 150 degree turn. As you apex, let the car drift toward the outside of of the turn on the exit. As you reach the left edge of the track on exit, be ready to head across the track (to the right) so that you'll be in the right position to wpex T2.
SOUTH COURSE: Enter from track left. Turn in late, near the outside of the track, but try to miss the dip at the transition. Look way ahead for T2.
Turn 2
The track map is not completely clear about this turn. It envisions turn 2 to be at the end of turn 1. I think of turn 2 as the little kink in the track (to the left) as you get ready to arrive at the turn-in of turn 3. As you exit turn 1 you should be headed across the track to the right so that you can keep the throttle down as you go through the kink. As you apex the kink, prepare to brake hard and in a straight line, heading for the outside turn-in point of turn 3.
Alternatively, you can get on the power early in T1 and let the car track out through T2 towards the curb on the left. You never really find an apex in T2, but you are hard on the power all the way out of T1.
SOUTH COURSE: Coming from T1, you should find a very late apex; touch the curb a little bit and track all the way out. After track out, you should be aimed back towards center/center-right track under the tree at the corner worker station.
Turn 3
Use all the track available for turn 3. This is a 90 degree left and you'll have to slow down considerably for it. Enter from the far right of the track, apex normally, and let the car drift back to the outside, which is where you'll need to be for the entrance of turn 4.
T3 is deceptively fast, but much of it is determined by how you take the kink leading up to it. Stay mid-track through the kink and let yourself drift full track right and brush the brakes before turn-in. Do NOT use a late turn in here because you will have to slow down too much to give the car the steering input it needs. Again, you don't have to slow down as much as you might think. Use the curbs at the apex and track-out points. The key is to keep your eyes up.
SOUTH COURSE: The kink. Apex on the left and immediately drift to full track right for the braking zone before the corkscrew.
Turn 4
Resist the tempation to overdrive turn 4. This turn is the setup turn for the next part of the track which is fairly technical. It is imperative to be at the right place for the turn-in to turn 5 and if you overcook turn 4, you'll miss it. YOU MUST SLOW DOWN for turn 4 until you find out exactly how fast you can go and still hit the entrance of 5 correctly. Upon exit of 4 you will not be able to let the car go all the way to the outside of the track before turning in to 5. If memory serves me, pinch off the exit of the turn so that you are 1/2 - 2/3 of the way to the outside of the track (on the left) so that you are set up for the right handed #5.
SOUTH COURSE: Brake in the dip and up the hill. Just as you crest the hill, begin to turn in for a late apex at the end of the curb in T4.
Turn 5
Turn 5a is one of the three or four most important turns on the track because it sets you up for the run up the hill through the climbing esses. If executed correctly, you can pick up an amazing amount of time through the esses, so be careful to be set up properly in 5 and 5a. Since you may not have had the opportunity to get all the way out to the left part of the track when it was time to enter 5, if you're going too fast, you'll find yourself going off the track at the end of 5. You're better off going a tad slower through 5 so that you can get on the throttle early for 5a. Try to find yourself at the extreme left on the track at the exit of 5 and then the turn-in point for 5a, resist the tempation to turn-in to 5a early. You will be rewarded by being able to get on the throttle earlier and hold the speed through the upcoming climbing esses.
SOUTH COURSE: Turn in and run over the curb. Track out spits you right into T6. You should be roughly center-track here. Sometimes taking a straight line from the apex of T5 immediately to the inside curb of T6 and running the inside line all the way around works well. Try both ways.
Turn 6
Turns 6 and 6a are nothing significant. Keep the pedal to the floor and drive. Straighten them out as much as possible.
SOUTH COURSE: Try the aforementioned inside line on the curb, or turn in from center-track and late apex. Both lines should track out all the way to the curb on the right.
Turn 7
The map is a bit deceiving. As you pass under the bridge, shortly there is a slight kink to the left which starts your uphill ride. When you apex this left kink, HOLD THE CAR TO THE CURB ON THE LEFT FOR AN EXTRA CAR LENGTH. This sets up up for a better run up the hill. This will allow you to turn less as you accelerate up the climbing esses. The last thing you want is to have to transfer the weight of the car at the speeds you'll be going.
NORTH COURSE: Go under the bridge full track left and turn into T7 center track (there's a V-shape where the two pieces of pavement from the cutoff meet the full course). The transition gets steeper the farther you are to the outside, so find what works best for your car. Get on the power early and use all the grip from the steep hill. Look up (yes, up) to the apex curb. As you crest the hill, run over some of the pavement from the Patriot course cutoff.
SOUTH COURSE: Very similar to T1/T2 on the south course, but at a smaller scale. Turn in very late and use a late apex. Track out to the V where you enter the full course on the uphill esses (T9).
Turn 8
This is part of the climbing esses. If you were set up correctly after you turned to the left after the bridge, you are in good shape. If not, you are mowing the grass at a very high speed.
NORTH COURSE: Run over the curb and head for T9
Turn 9
T9 is the place that you're going to have a problem if you were not set up correctly. It is a right that you need to enter at the right place. If you're in trouble because you're in the wrong place or going too fast, brake a bit before entering 9. If you're set up correctly, you may only need to breathe the throttle (or maybe even throttle through 9 if you're really good). Upon exit of 9 get back to the gas as you've got a little straight before you get to 10.
T9 is the last of the uphill esses (a right turn). As you crest the hill at the track out you should be about center track. Ease back to track right for T10.
NORTH COURSE: Use a couple inches of curb and get back full track right for the entry to T10.
Turn 10
Turn 10 is deceptively fast. Do not over brake or scrub off to much speed. Build up to your max here as going off can be punishing. This turn is a bit off camber and heads downhill. You'll want to get back on the gas by the time you apex the corner. Be sure to know your braking point for 11 well. You can be going fairly fast here and need to get on the binders for a very slow turn at 11.
T10 is pretty flat, but VERY fast. Brush the brakes a little bit on the entry (maybe down a gear in some cars). Be sure to look up early to find the track out which is downhill and a bit blind. If you get in trouble here, go off track right; do not try to save it and end up in the wall track left.
NORTH COURSE: If your car has grip, turning in a little early and hugging the inside will be fastest. If not, wait a couple feet later to turn in and late apex the corner.
Turn 11
There are two ways that you can take T11. Both of them have the same goal, to be in the right spot to enter T12. There is a cone at the outside turn-in point for T12 and that's where you want to aim for. One of the ways to take 11 is to turn right early and apex 11 immediately. You may then have to give it some gas as the cone on the ourside of the track is still quite a way away. In the alternative, you can rim ride the outside of 11 coming to the outside cone for T12. I have only experimented with rim riding. Try it both ways.
NORTH COURSE: Stay off the curb, but get right up next to it. One steering input should get you through to T12. DO NOT LIFT!
Turn 12
This may be the most important turn on the track. It leads on to a one mile straight. Any extra speed that you can get from a good launch, will be multiplied many times over as you go down the back straight. Apex 12 a little late and be in a position so that once you put your foot to the floor, you do not have to lift in order to not go off the track to the left. Even an extra 5 feet is hugely helpful in the extra speed you'll pick up.
NORTH COURSE: Stay off the curb a couple feet in T12 (the right). Run all over the curb in T12A (the left). Straighten the wheel and prepare for your braking zone.
Turn 13
If you're following the embedded track map, there is no turn 13.
Turn 14
At first, you might have a tendency to over-slow coming into 14. There is no doubt that you will have to shed a lot of speed at the end of the straight, but you'll also be surprised how much speed you can carry into 14. Only do half of your braking for 14 and then do the rest between 14 and 14a. Bear in mind that when you turn into 14a, you'll need to stay to the right (pinch the exit of the corner) so that you are set up for turn 15.
NORTH COURSE: Brake on the left side of the track and turn in pretty early, hugging the inside of the corner. Now you're back on the full course.
Turn 15
You should have pinched the exit of 14a so you're still all the way to the right, preparing to turn in (left) on 15. As you pass the apex, give it full throttle and head to the second cone on the right side of the track. This is the turn-in point for 16 and you want to get there as fast as you can.If you exit 15 correctly, you'll be going fast when you arrive at the entrance of 16.
I disagree in regards to the exit of 14A/entrance to 15. Exiting 14A, you should be aimed right at T15, and you can stay full throttle all the way from the exit of 14A through 15. No reason to pinch the exit and stay right.
Turn 16
If you exit turn 15 correctly, you should be in the right place on the track for turn 16. Apexing 16 is a small move and it's important that you don't scrub off too much speed in 16. I used to brush the brake to settle the nose on the exit of 16 going to 17 but have found that breathing the throttle is adequate. When you exit 16, know that you are going to want to hang your right wheels in a little groove around 17. Be ready for that.
The school line through here is to brake in a straight line, turn. If you want to be fast, turn in early (on the gas) and then trail brake down to the apex of T16. WARNING: you will need car control skills to accomplish this. Use the curbs in T16 and feed in a little power as you turn in for T17; use the curbs again, and go full throttle as the suspension compresses coming off the downhill section.
Turn 17
That groove is really a small gulley along the curbing on the right. Put your wheels in it and ride it about a tiny bit as you head to the outside of the track in your setup for turn 17a. You need to be near the outside edge so that once again, you can get power to 100% as early as possible. If you are taking 17 properly, you should be at full throttle when you pass the outiside cone for 17a. 17a leads to the second longest straight and you need every inch of WOT headstart that you can get. Just like at the Oaktree (turn 12) the point is to give it full throttle at the point where you won't have to get out of the gas again to correct. By the way, there is a gradual kink in the front straight, but even at 155 it's easy to straighten out without lifting. And that's your lap of the full course at VIR.
Patriot Course
No one has really numbered this course as far as I know. I am going to start with the downhill right at pit out.
Enter at full track left with a quick application of the brakes. You should be right at the outside of the pavement when you turn onto the Patriot Course cutoff (right beside the cement V). Look ahead to the apex curb. Brake in a straight line at the bottom of the hill (very briefly) and use the curbing as you turn in for the left hander. Use all of the curbs here and again at the top of the hill at the apex and track out for the right hander.
Draw a straight line down to T6 of the South Course (SCT6). Turn in at the end of the curbing and late apex SCT6. Now you're heading up the corkscrew. Run over the curb in SCT5. Apex SCT4 about 4 feet before the end of the curb and track out all the way to the exit curbing.
Apex the kink and head up the hill in preparation for the braking zone at SCT2. Run over the curbing on the left. This is pretty much just a slalom. Use all of the curbing and as much of the grass as you can get away with.
When entering the North Course cutoff again, you should be tracking out all the way to the curb at NCT11. Late apex (end of the curb) NCT10. Late apex NCT9 and straighten up for the braking zone to start another lap.
This whole course is basically just an autox, but certainly more elevation change than most road courses will ever see. The basic strategy is to use all of the curbs and more at almost every corner. If you ever have the opportunity to drive this course, jump on it!
-Michael Skeen