From Trackpedia
If you know this track then please try to start this guide. Once, someone starts then other readers should refine it to make the descriptions better. But, someone has to be first. Just click the edit button on the top of the page or the right and go.
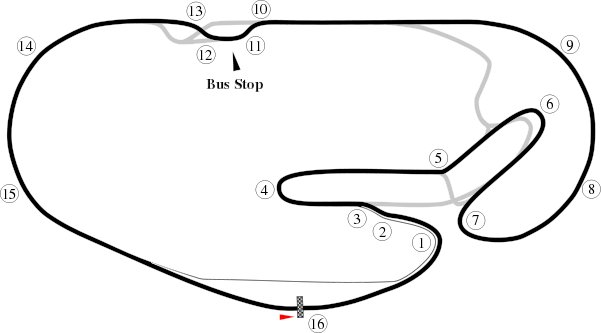
Track Map
Turn 1
After crossing the start finish look for your brake marker going into T1. The fence on the right can be used for reference as can the long white dashes painted on the track surface. Enter the turn track right while completing any trail braking on turn in. Begin to turn when you reach the point where the track splits from the speedway (denoted by white painted lines on the surface). Apex late about a car length after the tire stack on the pit wall on the inside of the turn. Unwind the wheel until you are pointed at the apex of T2.
Turn 2
Very straightforward, just nip the apex on the yellow curb. Don't be afraid to put a whole wheel up on the yellow curbing.
Turn 3
Carry momentum through T2 towards T3, you should be flat since T1. Keep the car stable and on a line between the apexes of T2 and T3. After T3 apex, allow the car to track out to the right if it wants to. Start to bring the car back to the left to prepare for T4 braking and entry.
Turn 4
Approach T4 on a diagonal from the track-right exit of T3 to the track-left turn-in of T4. Braking signs are on the inside of the horseshoe but it's more convenient to pick your braking mark to the left or use the dashed blend line of pit-out. You should be track-left at the end of braking. Turn-in when the left edge of the pavement begins to turn and aim for the apex 5/8 of the way around the inner curbing. Apply power early as there is plenty of room to track out.
Turn 5
This kink can be taken very quickly if you set it up correctly. Slower momentum cars can take it at flat or with a very brief throttle breathe or lift. Faster cars may need to longer lift and possibly even a brush of the brakes. Braking markers are on the right. The short section of curbing on the right can also be used as a reference. Carry as much speed as possible through the turn and aim to apex about 2/3 of the way through the inner curbing. Track out onto the outside curbing but try not to go very far onto it as it can be rough.
Turn 6
T6 is tricky as there are many lines though it and you need to be VERY patient. The apex is very late, about 7/8 of the way around the inner curbing. Resist the temptation to apex any earlier or you will find yourself running out of room on track-out and having to loose speed. Brake towards the track-left turn-in much in the way you did for T4. Turn-in at the point where the painted line on the outside of the track splits off and stops running parallel with the edge of the paved surface. Remember to be patient and wait for the very late apex.
Turn 7
It's important to carry as much speed as possible through T7 to maximize you speed at the end of the superstretch. Look for your braking points to the right of the track. The access roads and motorcycle track turn-offs can be handy in finding reference points. This turn has 2 apexes. The yellow curbing on the inside is the first apex but resist the temptation to brake too hard and take this first apex late. Turn in at the end of the curbing on the right-hand side of the track at the end of braking on what would seem to be an early apex. Clip the inner curb The important thing is to maximize the radius of the turn and end up clipping the curbing on trackout about a car length after the tire barrier on the outside of the turn. Roll onto the throttle after the first apex and apply more and more gas as you approach the outer curbing. You should be flat when you start to unwind the wheel and head for the transition to the banking.
Turn 8
The banking at Daytona is one of its very unique features. The 33 degree banking can create some challenges that you might not see on other tracks. The most striking realization you make the first time on the banking is how rough it is. The surface may seem smooth when you watch it on TV but there are a bunch of tiny bumps and ruts that keep your hands busy on the wheel. The surface isn't terrible, but keep your wrists loose and be ready for any sudden minute steering changes you may need to make. Passing on the banking in DE's is usually indicated with a blinker when a signal is required since it is very hard to see a drivers arm and hand when you are above them on the banking. Keep a watch on your mirrors if you are in a slower car. You have a limited view both in front and behind you due to the curvature of the banking and fast cars can come up on you quickly.
Turn 9
T9 is simple, the transition off of it onto the superstretch is smooth and gentle. Hammer down.
Turn 10
Entrance to the bus stop. Look for your braking marker on the right using the signs and/or fence as reference points. The apex of T10 is easy to see. Don't be afraid to get 2 wheels on the curbing.
Turn 11
You can drive through the apex of T10 right through the apex of T11. You should be able to take T11 and T12 on the same arch. Unless you are carrying a lot of speed through the bus stop you shouldn't need to use the outside curbing. Most cars will proceed between the apexes of T11 and T12 and only come within half a car length of the outer curbing.
Turn 12
Linked with T11, you should be able to feather the throttle through T11 and be flat through T12 and T13.
Turn 13
Flat out, be aggressive with the curbing and cut it as close to the inner edge as possible to straighten out the run back onto the banking.
Turn 14
Go fast. Turn left.
Turn 15
Keep going fast. Keep turning left.
Turn 16
Through the start/finish and looking for the braking point for T1.