From Trackpedia
If you know this track then please try to start this guide. Once, someone starts then other readers should refine it to make the descriptions better. But, someone has to be first. Just click the edit button on the top of the page or the right and go.
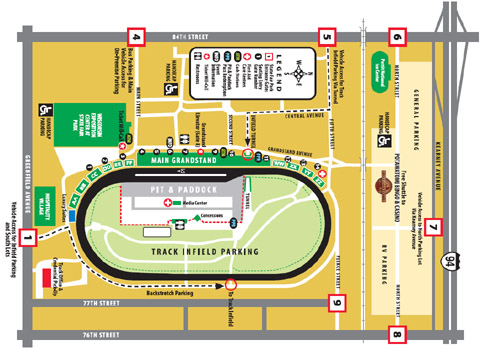
Track Map
Turn 1
Turn 1 is the entry from the oval onto the road course. It is a nearly 180-degree right-hand hairpin, but the entry is very wide. The oval track is slightly banked, so entering high (driver's left) gives a slight gravity assist as well as opening up the corner for more speed. Outbraking can be done here, but stay close to the car you are passing -- don't go too low or you will be off-line. The middle of the corner has an extreme dip, so you have to be patient and give the car time to settle down before getting on the throttle. The dip seems to be less pronounced on the right side of the track.
Turn 2
Turn 2 is a very gentle left-hand bend. You will still be going relatively slowly after exiting Turn 1, so you should be flat out through 2. Set up for 2 by continuing the right-hand cornering from Turn 1, but don't go all the way to the right side of the track. Most cars can get through by entering from the middle of the track. Stay on the throttle, turn in gently, and power through. You should also not need to drift all the way to driver's left on the exit. Staying left, at least halfway, also sets up for Turn 3.
Turn 3
Turn 3 is a gentle but fast right-hand bend that should be taken flat-out. You have to start out near the left side of the track, which means not drifting too far right exiting Turn 2. Entering too far to the right will force you off the throttle. Turn in, late apex, and stay full throttle all the way through.
The track map shows a couple of back-and forth curves between Turn 3 and Turn 4. Straighten these out as much as possible and stay on the throttle.
Turn 4
Turn 4 is a right-hand kink at the end of the first infield straight, just before the entry to the Turn 5 hairpin. The also track drops off slightly after the kink (more pronounced on the right side of the track), with a slight chuckhole at the apex (2011). Combine that with the fact that you are nearly at full speed entering 4 and needing to brake and downshift to 1st gear for 5, and you get a very tricky corner.
This can be a good place to pass, but beware! There are many theories on which line is correct through 4. You may see the car in front of you dart to the "other" side, looking like he's pulling over to let you pass. It isn't necessarily so!
Turn 5
Turn 5 is the tightest 180-degree hairpin you're likely to find outside a parking lot autocross. The track is still bending right from Turn 4 at the entry to 5. Don't bother following the right side of the track. Enter Turn 5 from about the middle of the track, up to maybe 75% of the way to the right side. Turn in earlier than you might think and apex early. Get the car rotated and try to get the power down as early as you can (be prepared for wheelspin, even in a low-power car). The exit of 5 continues to bend left, so you can apex again after the exit.
This hairpin starts a drag race down the second infield straight, so there is a potential to lose a lot of time here. But don't rush it, because it's also easy to spin if you enter too fast.
Turn 6
Turn 6 is only a bend in the second infield straight. It should be taken flat out. The track drops off a little at the exit, so be ready for the car to drift a little. When the track is dirty, the car might try to get out from under you.
Turn 7
Turn 7 is the right-hand turn exiting from the road course onto the oval. The corner can be deceiving -- it looks very tight -- and you may be tricked into over-braking. The exit is uphill (banked) and very wide, so you should be able to carry a lot of speed. The track is also wide enough at the entry that you can get a lot of turning done before you are even in Turn 7 proper.
Enter at the left side of the track and turn well before you reach the oval. Power on early, apex late. You cross a set of rumble strips here, plus you have a dip at the transition to the oval. You should aim to cross them at as shallow an angle as you can manage (in other words, both left wheels should cross together, then both right wheels -- not both fronts and then both rears).
The exit banking will slow you down, so getting on the throttle early is key. If you climb all the way to the wall on the exit, you're doing it wrong. Let the car go about halfway up the track, then come back down for a second apex at Turn 8.
From here, you will be flat-out until at least the South Turn, possibly all the way to Turn 1.
Turn 8
Turn 8 (Turn 3 on the oval track) is a continuation of Turn 7. Most cars will apex here (driver's right) after exiting Turn 7. It should be taken flat out. Coming down the banking to the apex will give a slight boost. Make Turn 8 as straight as possible. Don't scrub off speed or waste time setting up for the turn or trying to reach an apex. Exit the turn by heading towards the outside wall (driver's left). Hugging the wall can help aerodynamically. Weigh this against the time and extra distance you have to drive to get up to the wall.
Turn 9
Turn 9, the "South Turn" (oval track turns 1 & 2) is a high-speed turn connecting the back stretch with the main straight. The majority of the turn is banked concrete, but the lower apron area is flat asphalt. Low-powered cars with good tires can enter flat-out. Faster cars may need to brake a little for the entry, but should not need to downshift.
To bank, or not to bank?? The banking is slight, so it does not do very much to hold the car. The asphalt apron has slightly more grip than the concrete banking. Driving on the banking also requires driving a longer distance than driving on the lower apron. Very fast cars may prefer the banking. Low-powered cars seem to do well on the apron. Try each and see which you prefer.
The South Turn can be a great place to pass. Just be aware that your opponent may want to come down to the apron in the middle of the corner, or will drift out to the wall at the exit. Don't get in his way!