From Trackpedia
If you know this track then please try to start this guide. Once, someone starts then other readers should refine it to make the descriptions better. But, someone has to be first. Just click the edit button on the top of the page or the right and go.
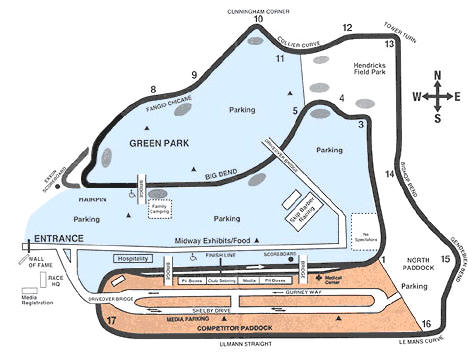
Track Map
Turn 1
High Speed Left Hander, very wide concrete, uneven and bumpy. Look for asphalt strip in braking / turn-in zone for a good reference point. Sometimes the apex has a traffic cone on the top fence pole. Be careful of unsettling bump at pavement transition from concrete to asphalt on approach to track out. One turn you do not want to early apex and run out of room.
Swing wide as you approach under the bridge to use all of the track at turn in.
Head towards the wall - the apex is just out of view, come very close to the wall.
As you pass the wall unwind and track out. Look for tower as a visual reference that will take you to the exit curbing, as it will be hidden when you are at the apex.
Fast and bumpy. Great place to pass, as the cars will be behind you through turns 2, 3, and 4.
Updated by Tom Kerr
Turn 2
Used as a set-up for braking into Turn 3. Turn in early and line up with the short shute to the T3 turn-in point. Watch the bump.
Turn 3
heavy breaking zone, left 90, FIA curbing on apex, sets up for T4.
Hard braking precedes a late turn-in. Stay late and as tight as possible for a wide, late entrance into T3. Braking is key.
Turn 4
late turn in, late apex, slow hands.. watch out cars going off and hooking back. Stay very wide for the entrance into T5. This sets up Turn 5 which leads onto the long Turn 6. Carrying lots of speed out of T5 is very important. Staying wide and delaying the entrance to T5 is key.
Turn 5
Enter as late as possible, get on the throttle as early as possible and carry as much speed as you can onto the long Turn 6. Watch for kicked up dirt at the apex and track-out points.
must turn in late, momentum cars need not brake but can just lift to transfer weight forward (ie 944) higher hp cars (twin turbos) need a touch of the brake deep in turn five.
edited last by tom kerr
Turn 6
concrete surface, can be taken flat out except by very high powered cars. Curbing at track out is flat and usable. Sets up back straight.
Initially hug the right side of track as you approach first walk over bridge. Car will roll out and track to the right side toward middle of 6. Stay left most cars can wait to brake until under the second bridge before the brake zone for the turn 7 hairpin. The Chateau Elan will be on your left and your family will probably be watching you from the pool!!
last edited by tom kerr
Turn 7
The hairpin, aka safetypin, they moved the turn up about 100 yds, and added a wiggle, HEAVY BRAKING.
There is a surface change from asphalt to concrete just before the turn in. FIA curbing at apex and track out is flat, and usable. Don't be afraid to put 2 wheels in the dirt on the exit. Late apex going in to 7 will set up earlier acceleration through 8 and 9 (Fangio Chicane).
Remember here that if you run out of brakes, you can continue straight as there is a good run off section of track past the apex of the hairpin
Updated by Josh
Added to by tom kerr
Turn 10
This is a full 90 degree right hander. Most people take a late apex to exit mid-track.
Drivers of low powered cars should use the full track at exit, and not give up early for this turn as there is sufficient grip and room to take turn 11 at full throttle. Drivers of high powered cars should give up 10 to be able to accelerate sooner through 11 and 12. There is an escape after the braking zone into 10.
Updated by Josh
Turn 13
Concrete surface, minor compression at apex, off camber at track out, pretty fast.
Cutoff to turns 3/4 for the Club/Short course - a hard right hand turn before Bishop's Bend - will require a downshift.
Updated by Josh
Turn 14
Can be taken as a single arc with two apexes, the last just before the approach to 15. High powered cars will need to modulate throttle through the turn.
Posted by Josh
Turn 15 - 16
Fast, linked turns that set up the long back straight. Let car track out after 15 and steer wide left to open up approach to 16. Turn 16 is now infamous for eating cars that overdrive the turn, drop a couple of wheels off at track out and then hook into the inside wall.
Posted by Josh
Turn 17
This is a very wide turn with several effective lines. Can be taken as a single late apex or double-apex turn. Very bumpy throughout the turn, especially so approaching and under the bridge. Sets up pit straight.
One DE line to consider is staying wide and as you turn in put your right wheels on the white line which will then be crossed by a black line and that is the turn in to aim at the apex cone on the front straight.
The "racing line" is more aiming at the wall to your right at the turn in to protect your line from being passed. Brake hard as you pass the end of the wall, and turn in. Keep turning. Track out to the wall at the left as you come on to the front straight.
The turn seems to go on forever. Don't track out too soon!
Posted by Josh
added to by tom kerr